Best Lighting in V-Ray for SketchUp
Getting the lighting right is super important for making realistic visualizations. I will show you how to do this correctly using natural and artificial lights. Let’s start 🙂
Dome Light
Let’s start by looking at natural lighting. I use a Dome Light and HDRI Maps for the best results. To set up this light, begin by clicking on the dome light icon located at the top of the interface
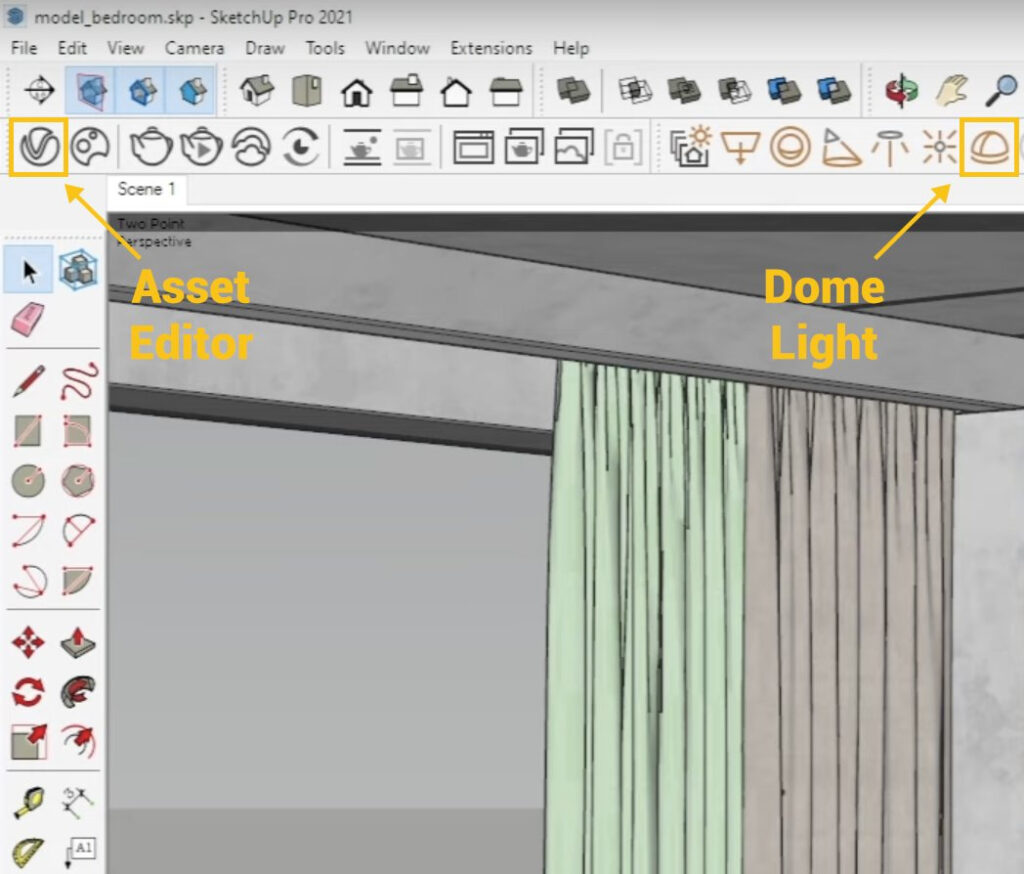
If you activate the Asset Editor window, you will notice a new option in the Lighting tab – the Dome Light.
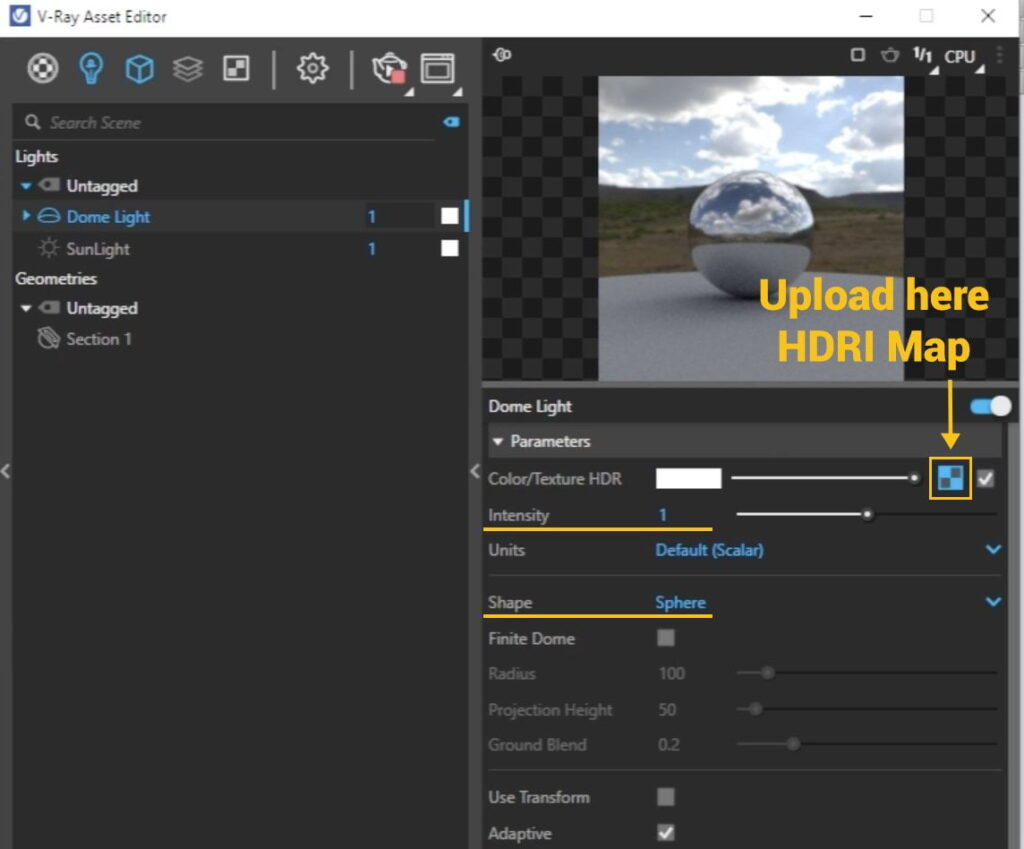
Now, it’s time to upload an HDRI Map. You can choose from HDRI maps available in the Chaos Cosmos Window or download them from the website. I often opt for HDRI Maps from the website https://polyhaven.com/hdris, which offers a vast selection of high-quality, free HDRI maps. Feel free to download maps from this website.
Once you’ve uploaded the map, it’s time to adjust some settings. Increase the intensity of the Dome Light to 30, 50, or even 100. Each HDRI Map behaves differently, so it’s essential to experiment with these settings.
Ensure that the shape of the dome light is set to a sphere.
Finite Dome
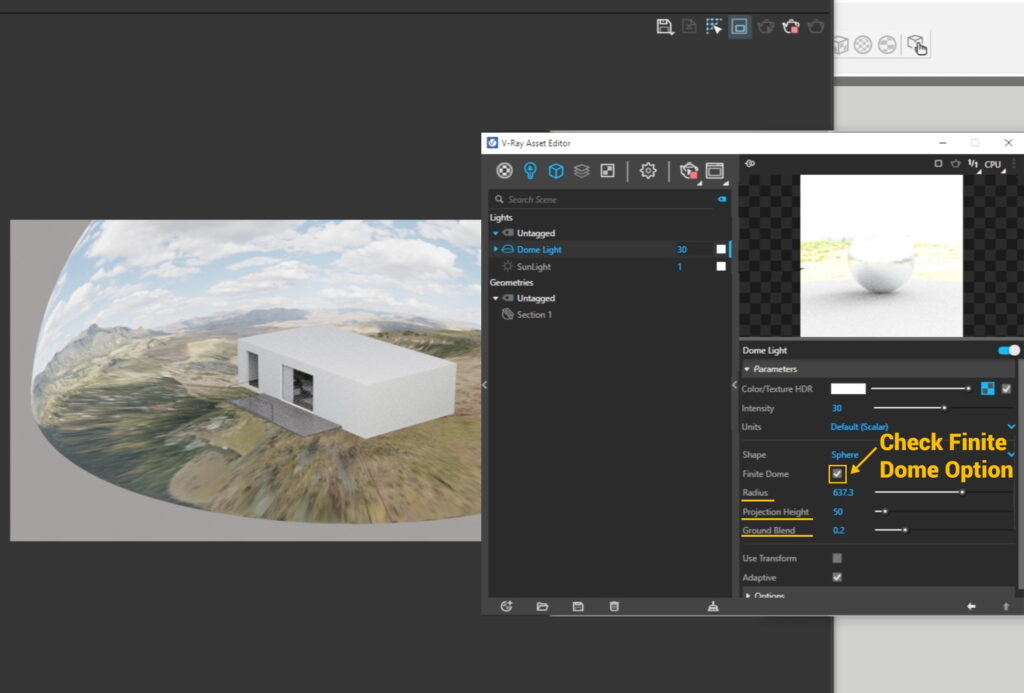
The Finite Dome is an excellent new feature available in V-Ray 6. This option enables you to adjust the Radius and Projection Height of Dome Lights It allows you to establish the surroundings for exterior scenes or the view outside windows in interior scenes.
To begin, activate the Finite Dome Option. You will see a small Half Dome in your render. To make the Finite Dome visible, you need to increase the Radius size. Experiment with different values; I usually set the radius between 500 and 1500.
The Projection Height option controls the ground level, so try different values.
The Ground Blend parameter controls the transition between the ground plane and the hemispherical upper part of the Finite Dome. It defaults to 0.2, and I typically leave this value unchanged.
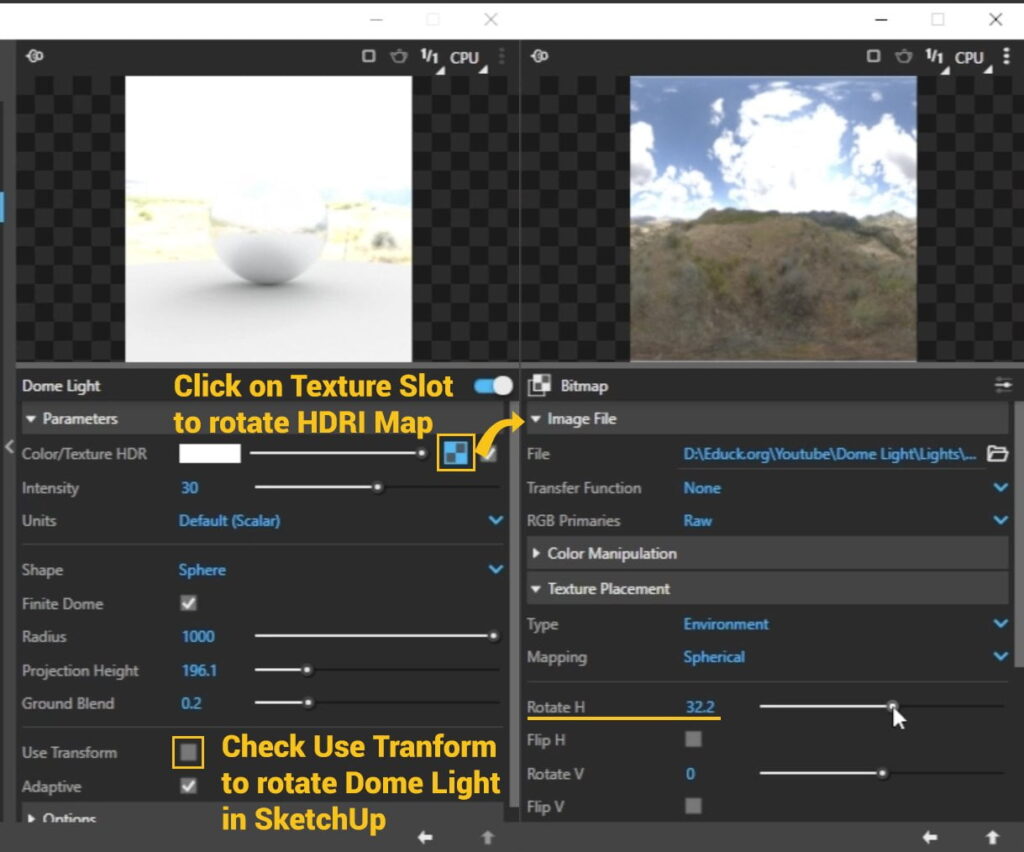
Keep in mind, that you can rotate Dome Light to obtain even better effects. There are two ways to achieve this:
- Activate the ‘Use Transform’ option and rotate the Dome Light within SketchUp using the Rotate Tool.
- Click on the Texture Slot where the HDRI Map is uploaded and adjust the map’s rotation using the ‘Rotate H’ option.
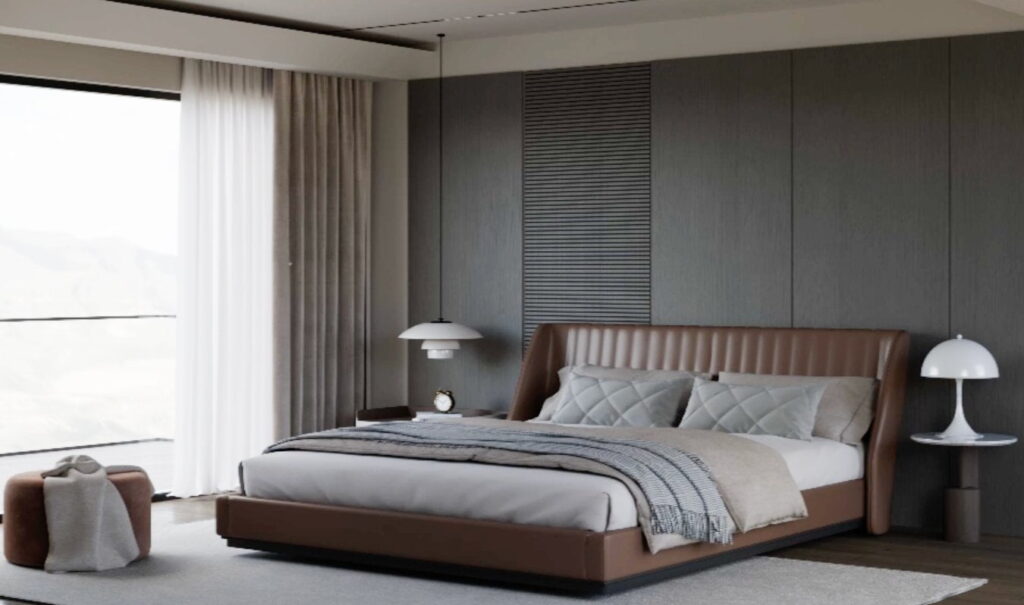
After making the adjustments, here is the result
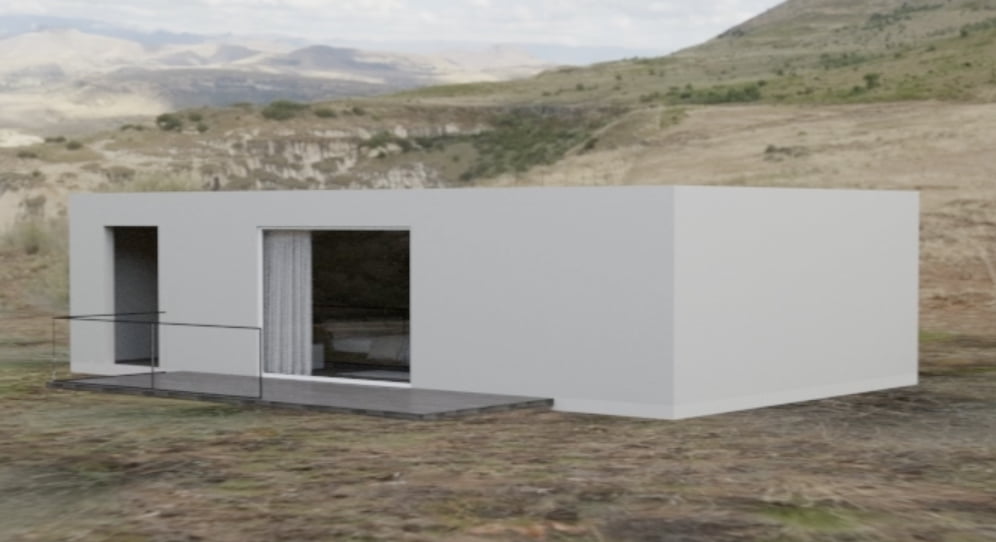
Dome Light in the Interior
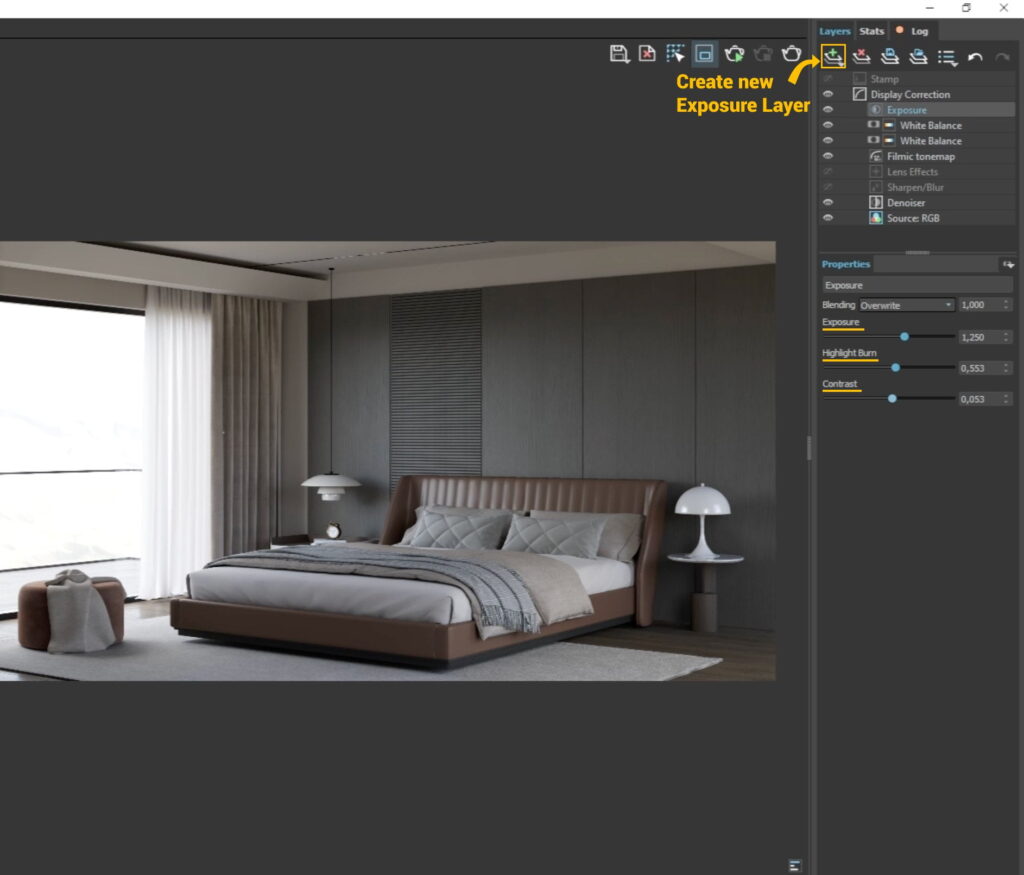
Exposure, Contrast, Highlight Burn
Now, it’s time to improve the lighting in the scene. To achieve this, add an exposure layer in postproduction. You can increase the exposure to brighten the scene, decrease the highlight burn values to eliminate overexposed areas, and slightly boost contrast.
These adjustments will significantly enhance the appearance of your scene.
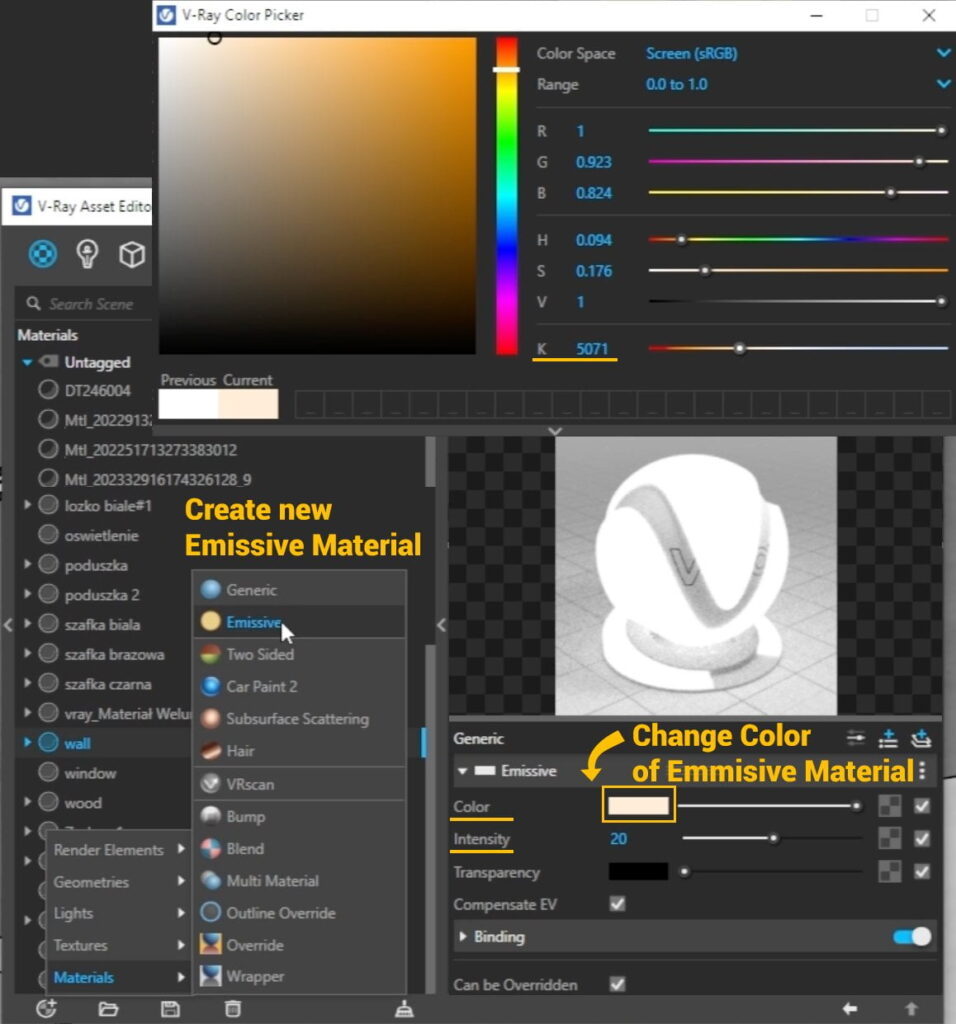
Emissive Material
Next, let’s set up artificial lighting. I’ll start with the light sources in the suspended ceiling. I want to illuminate them. You can achieve this by creating an emissive material or converting the models into mesh lights. In this case, I’ll opt for the first option.
To get started, open the Asset Editor window and create a new emissive material. Simply adjust the intensity and color of the material. I changed the color by adjusting the Kelvin Temperature to 5000, giving the emissive material a warmer tone. Then, modify the intensity, increasing it to 20.
Light Mix
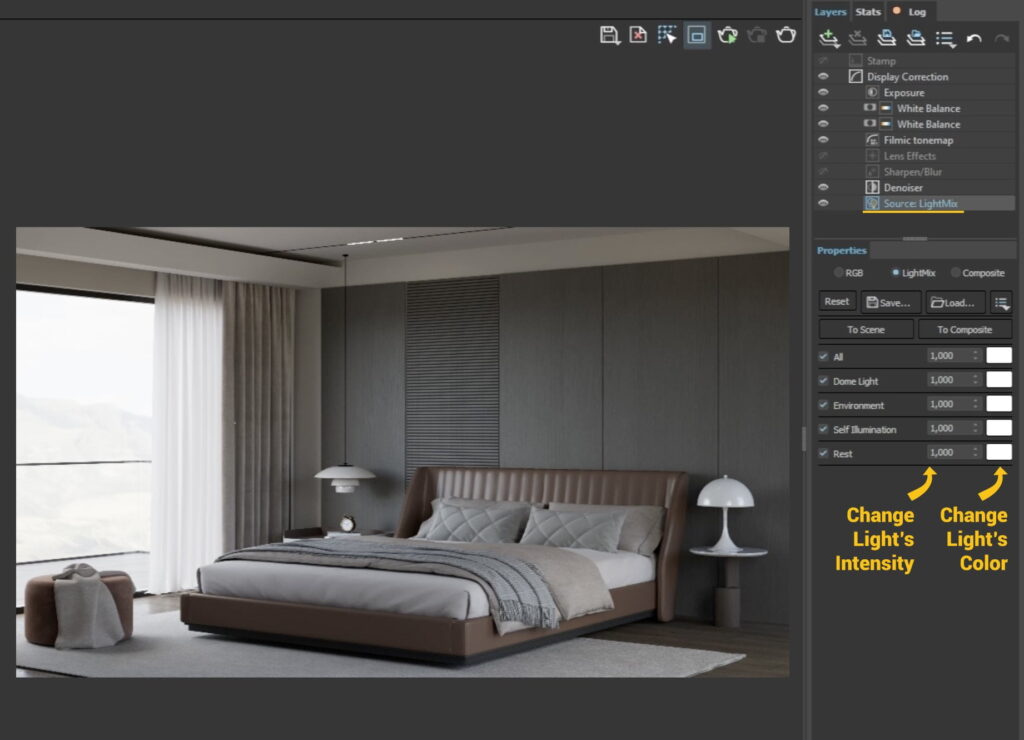
In my scene, I’m using both a Dome Light and an Emissive Material. To have better control over them, I use a feature called ‘Light Mix.’
To set it up, create a new element under ‘Render Elements’ and choose ‘Light Mix.’ In the Light Mix options, switch from ‘Individual Lights’ to ‘Group Instance.’
This groups similar lights together, which makes it much easier to adjust them later during post-production.
IES Lights
The most important type of lighting for interior renderings is called IES lighting. I usually place IES lights under the suspended ceiling and hanging lamps.
To use an IES light, just click the IES Light Icon and choose the right IES file. Many websites offer good-quality IES light files for free, and one I often use is https://leomoon.com/store/shaders/ies-lights-pack/.
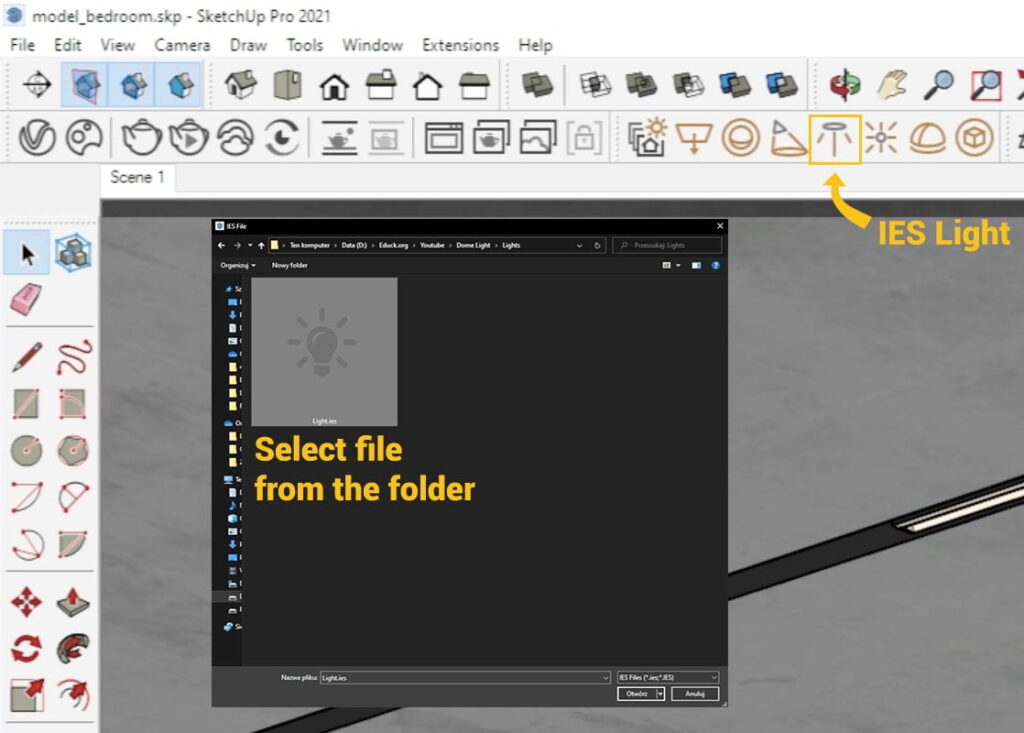
The next thing to do is put the light under the lamp. Remember, it’s really important to put it underneath the model, not inside it, or it won’t work properly.
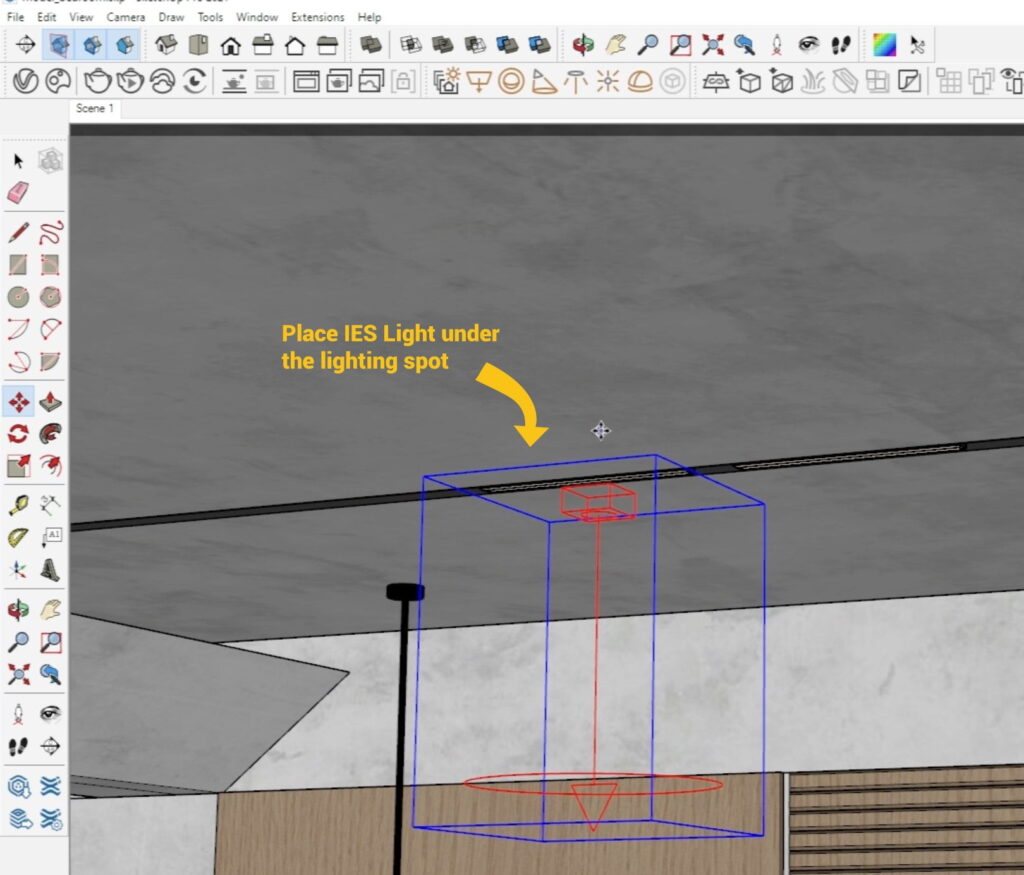
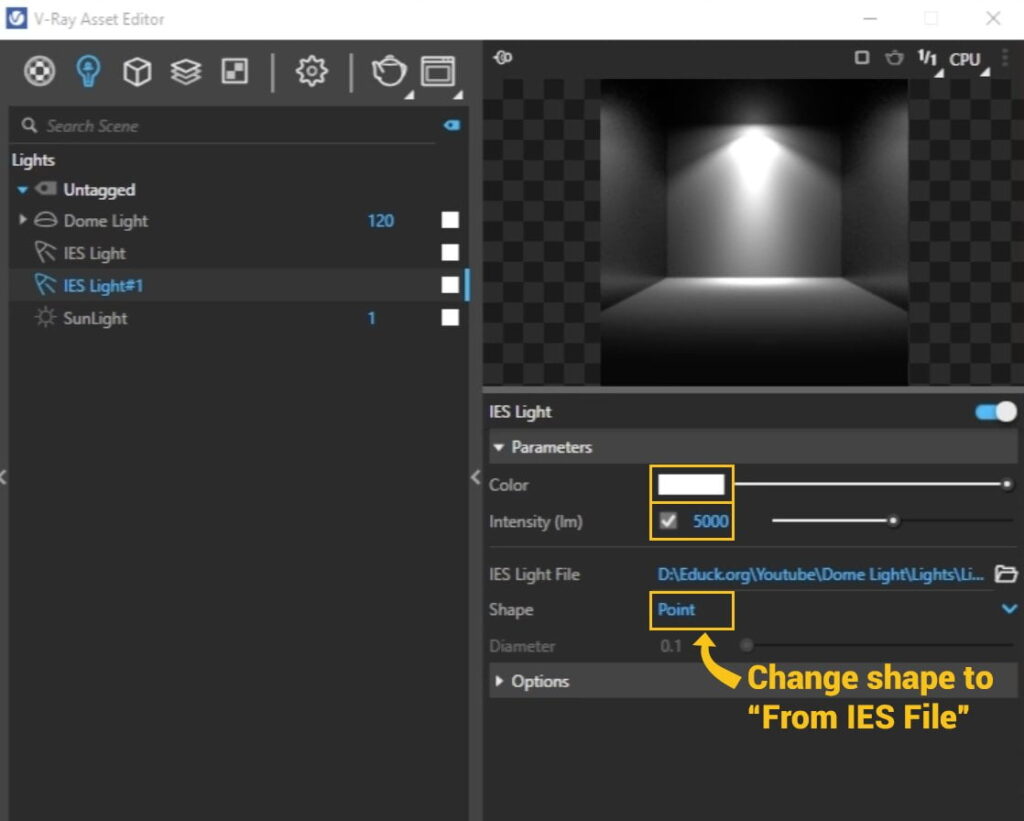
You can copy IES lights. They will be visible as a group in the asset editor for easier management.
In the asset editor, you can also change the color and brightness. Remember to set the IES file option to ‘from IES file’ for the right setup.
Sphere Light
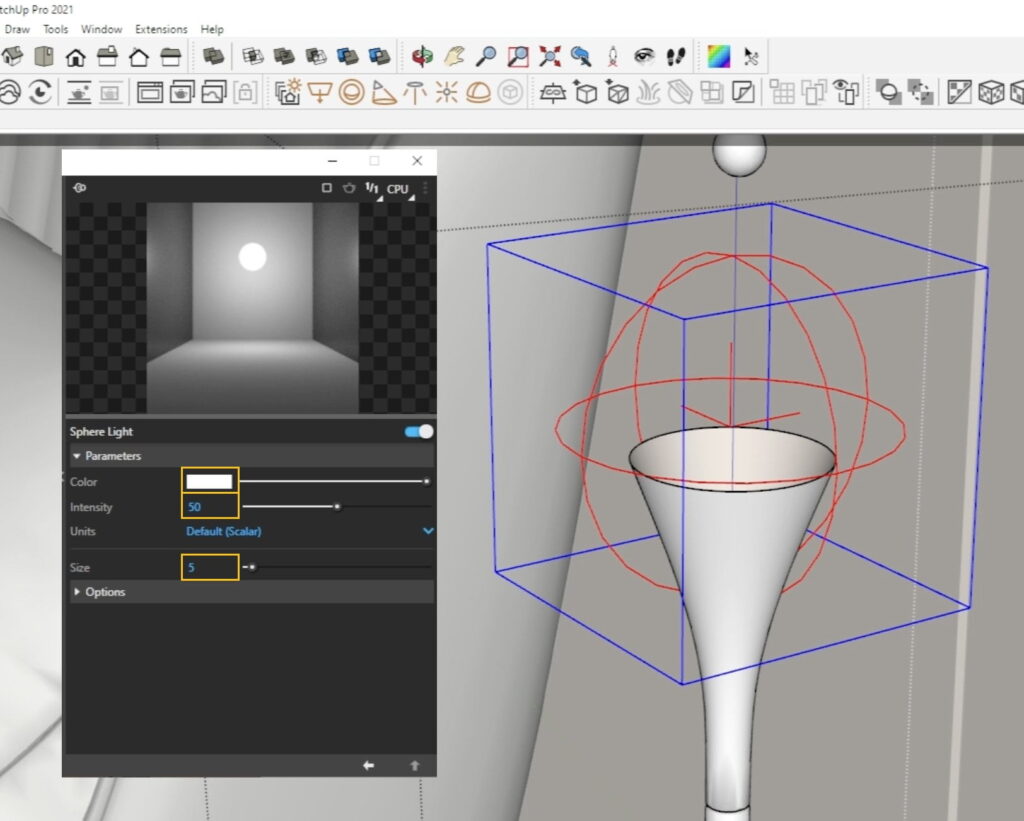
This kind of lighting is commonly used for lamps. I add a small sphere light inside the lamp to give it a soft glow.
I click the Sphere Light Icon, put it in the lamp, and adjust the color, brightness, and size.
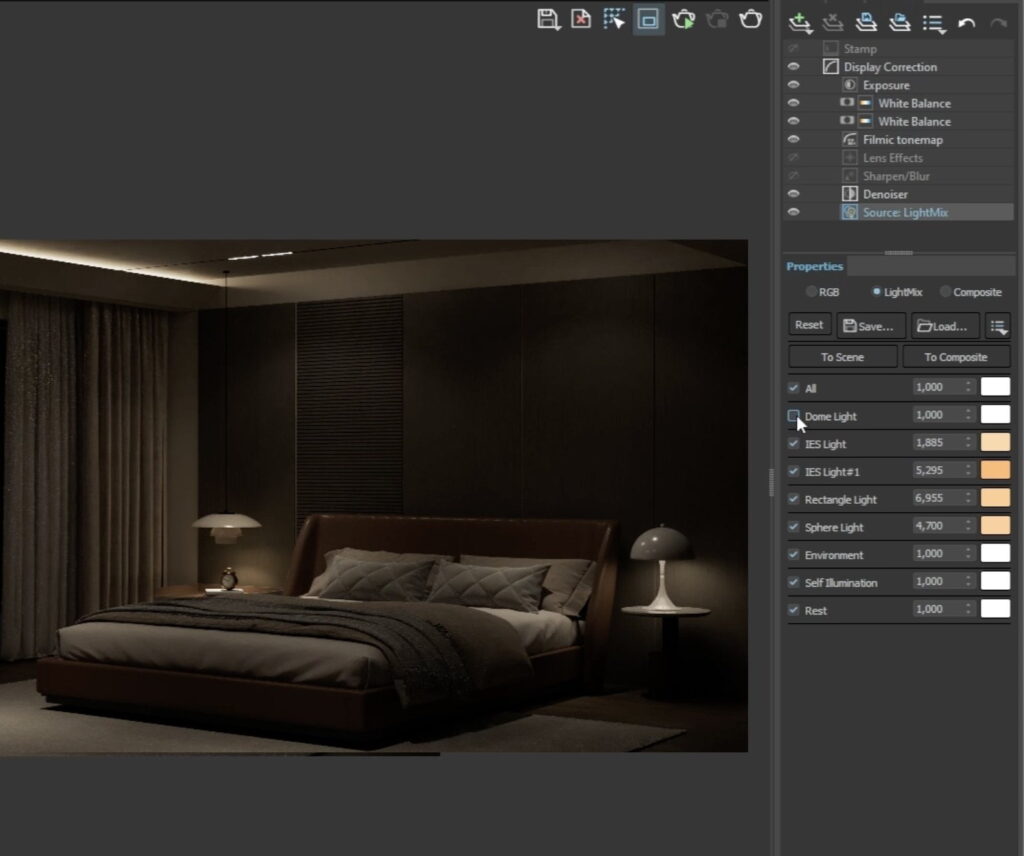
After adding these lights, here’s my final result. Remember, you can change the lighting using LightMix.
You can turn a daytime scene into nighttime, turn off the Dome Light, adjust the sphere light’s color, and more. Have fun experimenting with the lighting!
Summary
These are the most important light setting. Try out these methods in your project. If you want to learn more about lighting, watch my tutorial below.
