
Do You Think Photorealistic Visualizations Are Out of Your Reach?
Think again! With our course, you’ll quickly master the techniques needed to create stunning, professional visualizations, no matter your level of experience.
Our method is built on practical lessons designed to elevate your work instantly:
✔ Mastering Lighting – Learn how to use Sunlight, Dome Light, and IES to create realistic, natural lighting in your scenes.
✔ Creating Realistic Materials – Discover how to use PBR maps, ambient occlusion, and glossiness to give your materials depth and authenticity.
✔ Faster Workflow – Unlock expert techniques to speed up your work while maintaining top-notch visualization quality.
Join our course and fully unlock the potential of SketchUp and V-Ray. Create visuals that stand out from the competition and reach the professional level you’ve been aiming for!
Access to 75 Video Lessons – structured into chapters, covering everything from the basics to advanced documentation. Learn at your own pace and gain the skills needed to create professional projects.
Over 30 Ready-to-Use Photorealistic Materials – Plus 100+ high-quality textures and professionally set-up lighting assets that will instantly elevate your visualizations.
You'll also receive downloadable PDF files summarizing the PBR material creation process and a curated list of the best websites for models and textures. This way, you'll always have key information at your fingertips.
✔ Step-by-Step Learning – Our course guides you through the entire process of creating professional visualizations, from the basics to advanced techniques. Each lesson is explained in detail, making learning simple and enjoyable.
✔ Years of Experience – We’ve built our expertise through years of hands-on practice and real-world projects for various clients. We teach only proven methods that we personally use in our daily work.
✔ Trusted by Thousands of Students – We have trained thousands of learners who now successfully create their own visualizations. Our courses come highly recommended by many satisfied participants.
✔ Lifetime Access – Once enrolled, you get unlimited access to all materials, allowing you to revisit lessons anytime and learn at your own pace.
✔ Bonus Resources – Along with the course, you’ll receive extra materials to support your learning, including ready-to-use files, high-quality textures, and other valuable assets to enhance your visualizations.

At the beginning of the course, you’ll learn the fundamentals of creating visualizations in V-Ray. You’ll go through the installation process, get familiar with key features, and master different types of lighting and materials. You’ll also discover where to find high-quality models, lighting assets, and textures.
Through step-by-step lessons using simple scenes, you’ll gain a solid understanding of the entire process of creating professional visualizations.
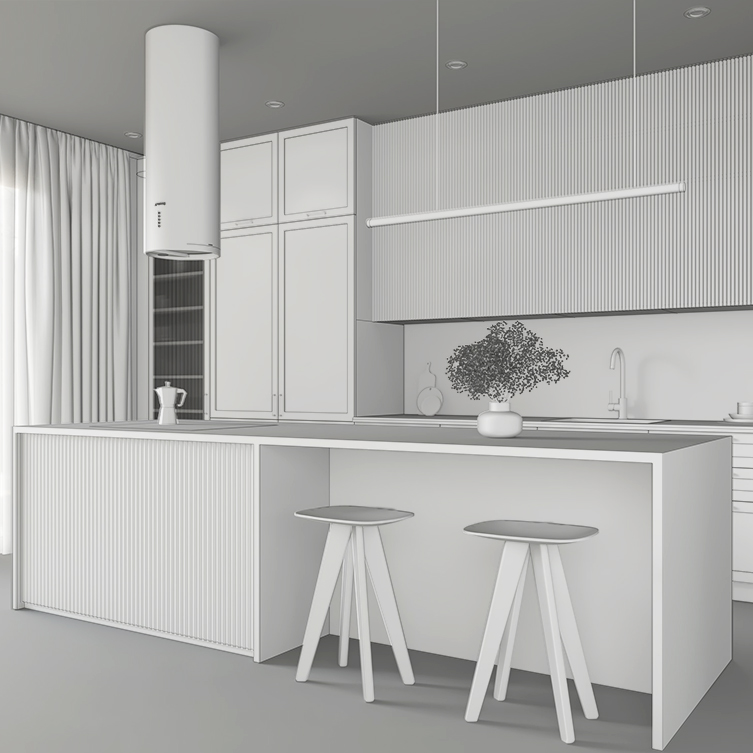
You will create a variety of models, including walls, custom furniture, cabinet fronts, kitchen islands, tiles, and panels. You’ll gain access to trusted sources where you can download high-quality models to enhance your projects.
You’ll also learn how to efficiently export models to SketchUp in FBX and OBJ formats. With strong modeling skills and premium-quality assets, your visualizations will look more professional and polished.
You will learn how to set up visualizations for both preview and final renders. You’ll discover how to adjust quality and rendering settings to quickly generate draft visualizations and create high-quality, professional renderings.
You’ll also understand how different settings impact the final result, allowing you to fine-tune your workflow and make your visualizations stand out.

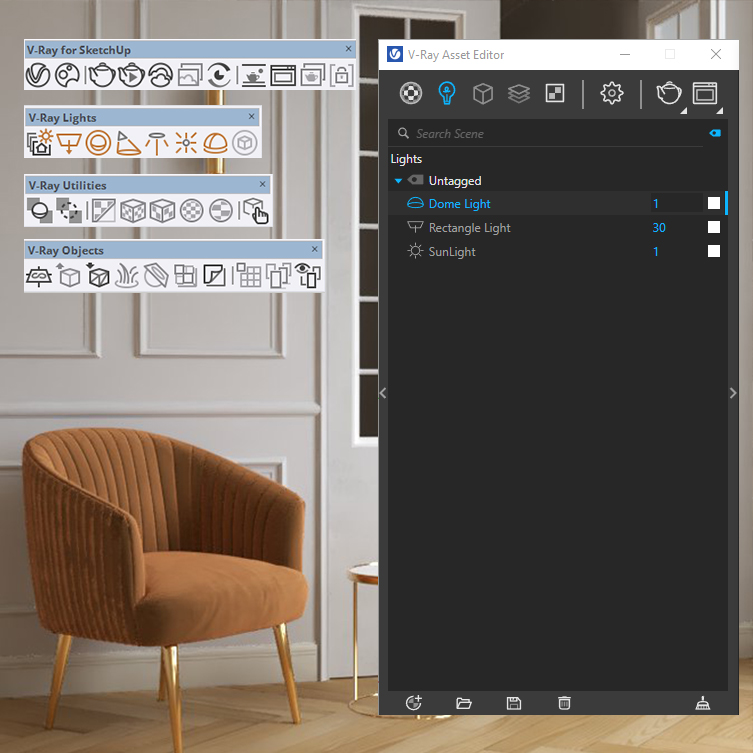
Learn how to effectively use different light sources to enhance your visualizations. You’ll gain the skills to set up:
✔ SunLight – Simulate natural sunlight for realistic daylight scenes.
✔ Dome Light – Illuminate your scene using HDRI maps for a natural ambient look.
✔ IES Lights – Reproduce real-world lighting effects from lamps and fixtures.
✔ Rectangle Light – Create soft, diffused lighting for balanced illumination.
✔ Mesh Light – Use emissive surfaces to cast realistic light in your scene.
✔ Emissive Materials – Add glowing effects to objects for enhanced realism.
With these skills, you’ll be able to create realistic lighting effects that significantly improve the quality of your visualizations and make them more engaging and professional.
You will create PBR materials that bring high quality and realism to your visualizations. Throughout the course, you’ll develop over 30 photorealistic materials and gain access to 100+ high-quality textures.
Additionally, you’ll discover the best sources for downloading PBR materials, allowing you to continuously expand and enhance your projects with professional-grade assets.

Discover the principles of composition that will make your visualizations look more attractive and professional.
✔ Master Camera Positioning – Learn how to set up the perfect angles to capture the best shots and create the right perspective for your projects.
✔ Adjust Camera Settings – Explore different field of view, focal length, and depth of field settings to achieve the desired effect and atmosphere.
✔ Enhance Visual Impact – Use composition techniques to guide the viewer’s eye and make your visualizations more engaging.
By applying these techniques, you’ll elevate the quality of your renders, making them more dynamic, immersive, and visually appealing.
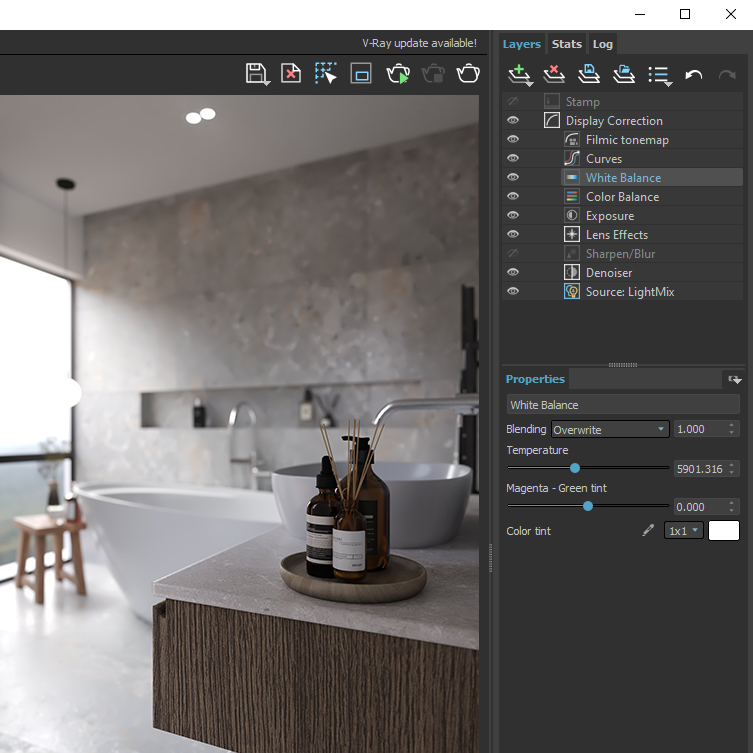
Learn essential postproduction techniques to enhance the quality of your renders after they are created.
✔ Adjust Lighting in Your Render – Modify light settings directly in post-production to achieve the perfect look.
✔ Refine Colors & Tones – Change the colors of individual models and fine-tune the overall scene color balance.
✔ Enhance Saturation & Contrast – Improve brightness, contrast, and saturation to bring out the best in your visualizations.
With these skills, you’ll be able to add the finishing touches that make your renders stand out, giving them a polished, professional, and visually striking appearance.
At the beginning of the course, you’ll learn the fundamentals of creating visualizations in V-Ray. You’ll go through the installation process, get familiar with key features, and master different types of lighting and materials. You’ll also discover where to find high-quality models, lighting assets, and textures.
Through step-by-step lessons using simple scenes, you’ll gain a solid understanding of the entire process of creating professional visualizations.
You will create a variety of models, including walls, custom furniture, cabinet fronts, kitchen islands, tiles, and panels. You’ll gain access to trusted sources where you can download high-quality models to enhance your projects.
You’ll also learn how to efficiently export models to SketchUp in FBX and OBJ formats. With strong modeling skills and premium-quality assets, your visualizations will look more professional and polished.
You will learn how to set up visualizations for both preview and final renders. You’ll discover how to adjust quality and rendering settings to quickly generate draft visualizations and create high-quality, professional renderings.
You’ll also understand how different settings impact the final result, allowing you to fine-tune your workflow and make your visualizations stand out.
Learn how to effectively use different light sources to enhance your visualizations. You’ll gain the skills to set up:
✔ SunLight – Simulate natural sunlight for realistic daylight scenes.
✔ Dome Light – Illuminate your scene using HDRI maps for a natural ambient look.
✔ IES Lights – Reproduce real-world lighting effects from lamps and fixtures.
✔ Rectangle Light – Create soft, diffused lighting for balanced illumination.
✔ Mesh Light – Use emissive surfaces to cast realistic light in your scene.
✔ Emissive Materials – Add glowing effects to objects for enhanced realism.
With these skills, you’ll be able to create realistic lighting effects that significantly improve the quality of your visualizations and make them more engaging and professional.
You will create PBR materials that bring high quality and realism to your visualizations. Throughout the course, you’ll develop over 30 photorealistic materials and gain access to 100+ high-quality textures.
Additionally, you’ll discover the best sources for downloading PBR materials, allowing you to continuously expand and enhance your projects with professional-grade assets.
Discover the principles of composition that will make your visualizations look more attractive and professional.
✔ Master Camera Positioning – Learn how to set up the perfect angles to capture the best shots and create the right perspective for your projects.
✔ Adjust Camera Settings – Explore different field of view, focal length, and depth of field settings to achieve the desired effect and atmosphere.
✔ Enhance Visual Impact – Use composition techniques to guide the viewer’s eye and make your visualizations more engaging.
By applying these techniques, you’ll elevate the quality of your renders, making them more dynamic, immersive, and visually appealing.
Learn essential postproduction techniques to enhance the quality of your renders after they are created.
✔ Adjust Lighting in Your Render – Modify light settings directly in post-production to achieve the perfect look.
✔ Refine Colors & Tones – Change the colors of individual models and fine-tune the overall scene color balance.
✔ Enhance Saturation & Contrast – Improve brightness, contrast, and saturation to bring out the best in your visualizations.
With these skills, you’ll be able to add the finishing touches that make your renders stand out, giving them a polished, professional, and visually striking appearance.
Instead of Spending Years Learning on Your Own!

I am an architect with over 15 years of experience in teaching visualization and interior design. Throughout the years, I have gained vast expertise working on architectural projects in China and Shanghai and many others.
Through my English courses on educk.org and Polish courses on educk.pl, I have helped thousands of students from over 70 countries develop their skills. My passion for sharing knowledge has led me to build a YouTube community of over 21,000 subscribers, where I share proven techniques for visualization and design in SketchUp.
As a lecturer at SWPS University in Kraków, I understand what it takes to create professional visualizations. I focus on practical, real-world examples that help my students quickly apply their knowledge in their work.
I invite you to explore my courses! I’m confident that learning together will not only be effective but also enjoyable, equipping you with the essential skills to create stunning visualizations that impress your clients.
0.MATERIALS TO DOWNLOAD
1.COURSE INFORMATION
1.1 Welcome and course information
1.2 How to use this course
1.3 How to download materials
2.INTRODUCTION TO V-RAY. INSTALLATION AND KEY FEATURES
2.1 Downloading and Installing V-Ray
2.2 Overview of V-Ray icons and Asset Editor
2.3 Visualization settings
2.4 V-Ray Frame Buffer
3. V-RAY LIGHTING
3.1 The role of lights in visualization
3.2 Creating lights and their properties
3.3 Camera settings – Adjusting exposure and brightness
3.4 Sunlight settings
3.5 Dome light
3.6 Setting up background behind the window
3.7 LightMix – Adjusting lighting in the render window
3.8 Adding fill and accent lights
4. V-RAY MATERIALS
4.1 Scene overview, introduction to materials
4.2 Diffuse tab – Uploading downloaded maps
4.3 Reflections – Reflections in materials
4.4 Bump in materials
4.5 PBR materials – How to download and Diffuse tab for bricks
4.6 PBR materials – Reflections
4.7 PBR materials – Bump – Normal Map
4.8 PBR materials – Transfer function: sRGB or None
4.9 PBR materials – Displacement
4.10 Best websites for PBR materials
4.11 Rounding material edges
5. MODELS IN SKETCHUP
5.1 Exporting models from 3ds Max to SketchUp
5.2 Plugins to export model
5.3 The best websites with models
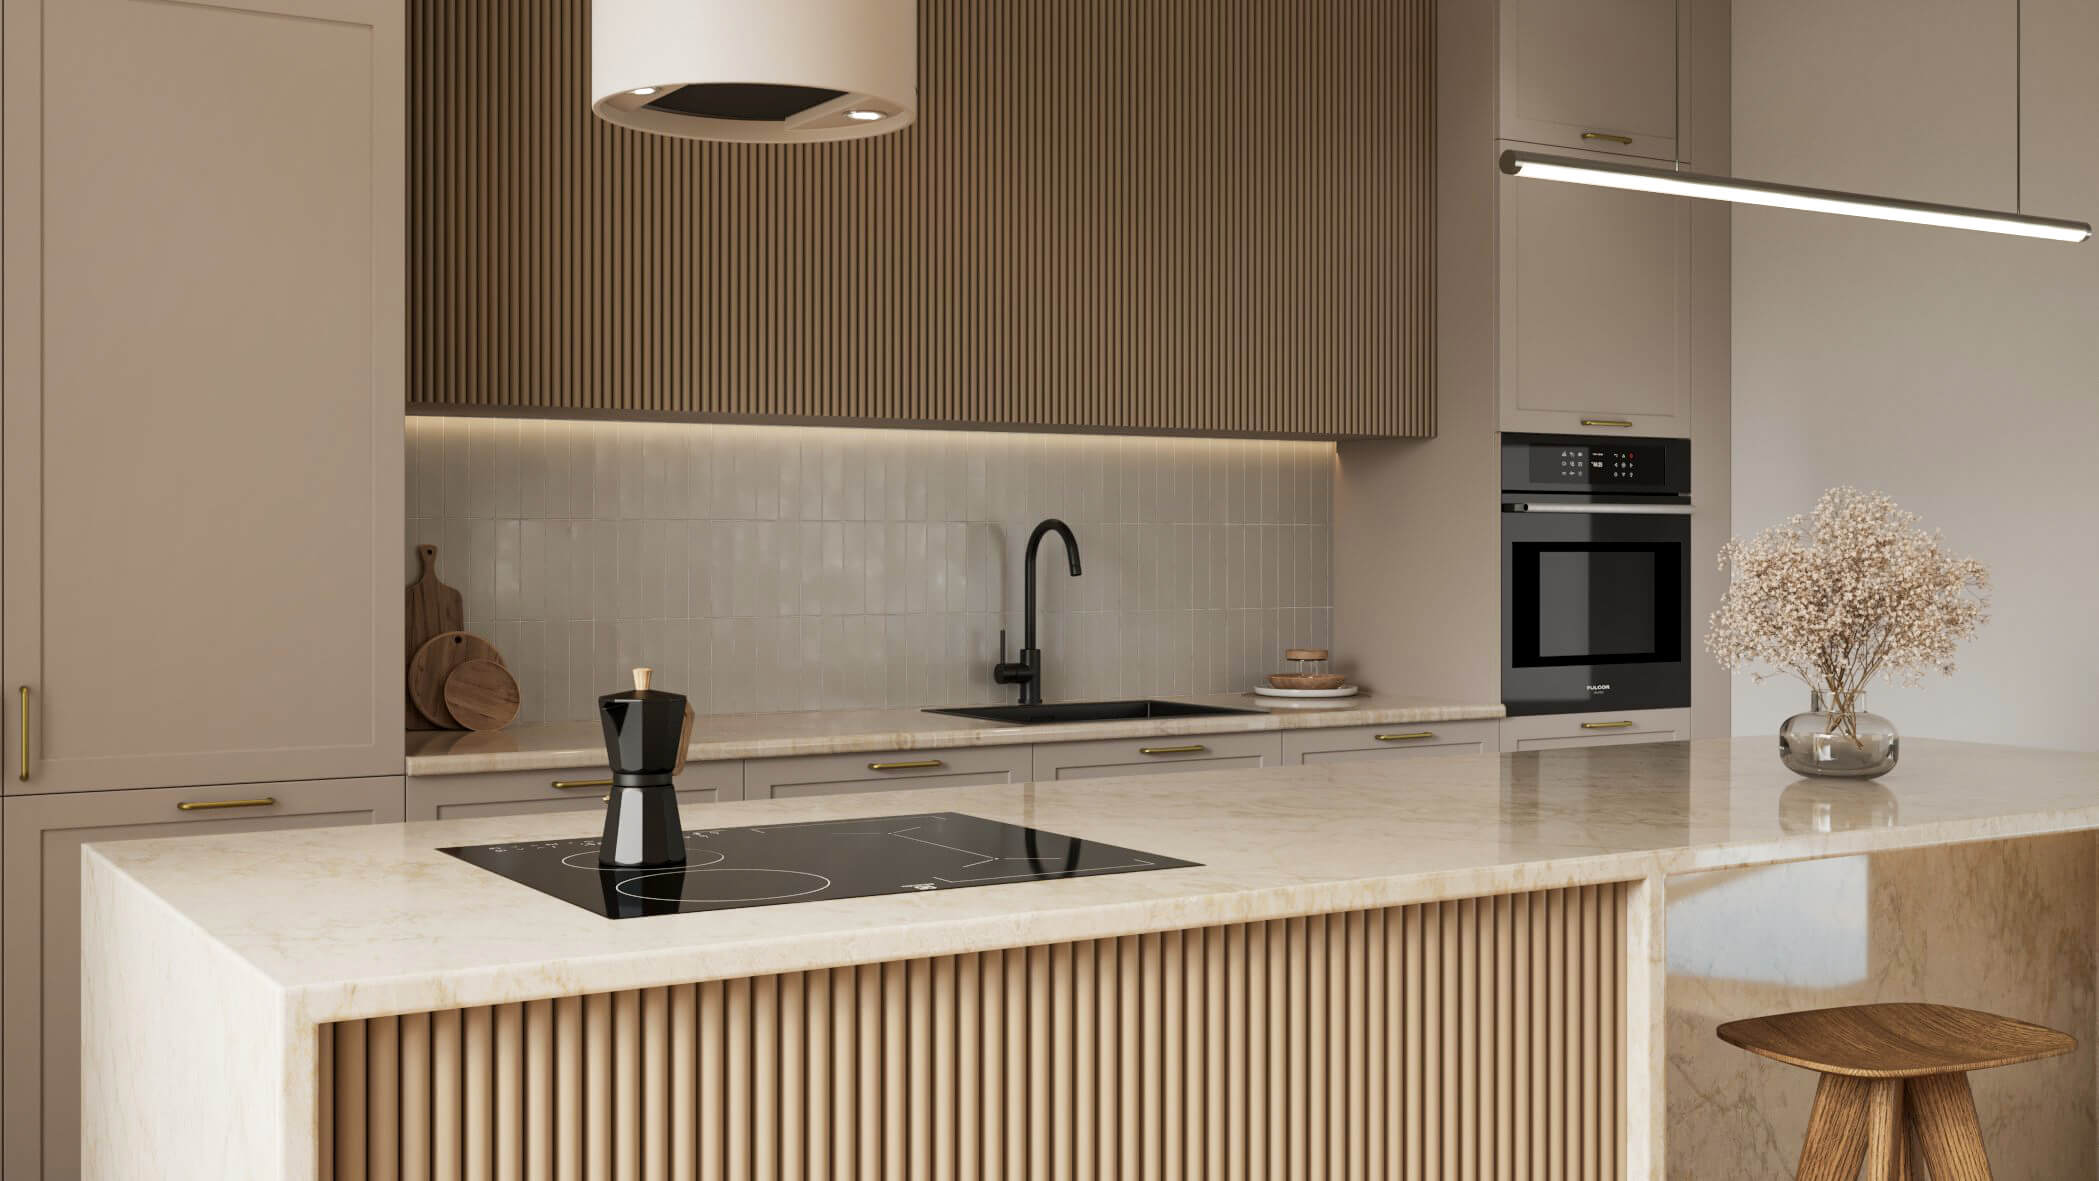
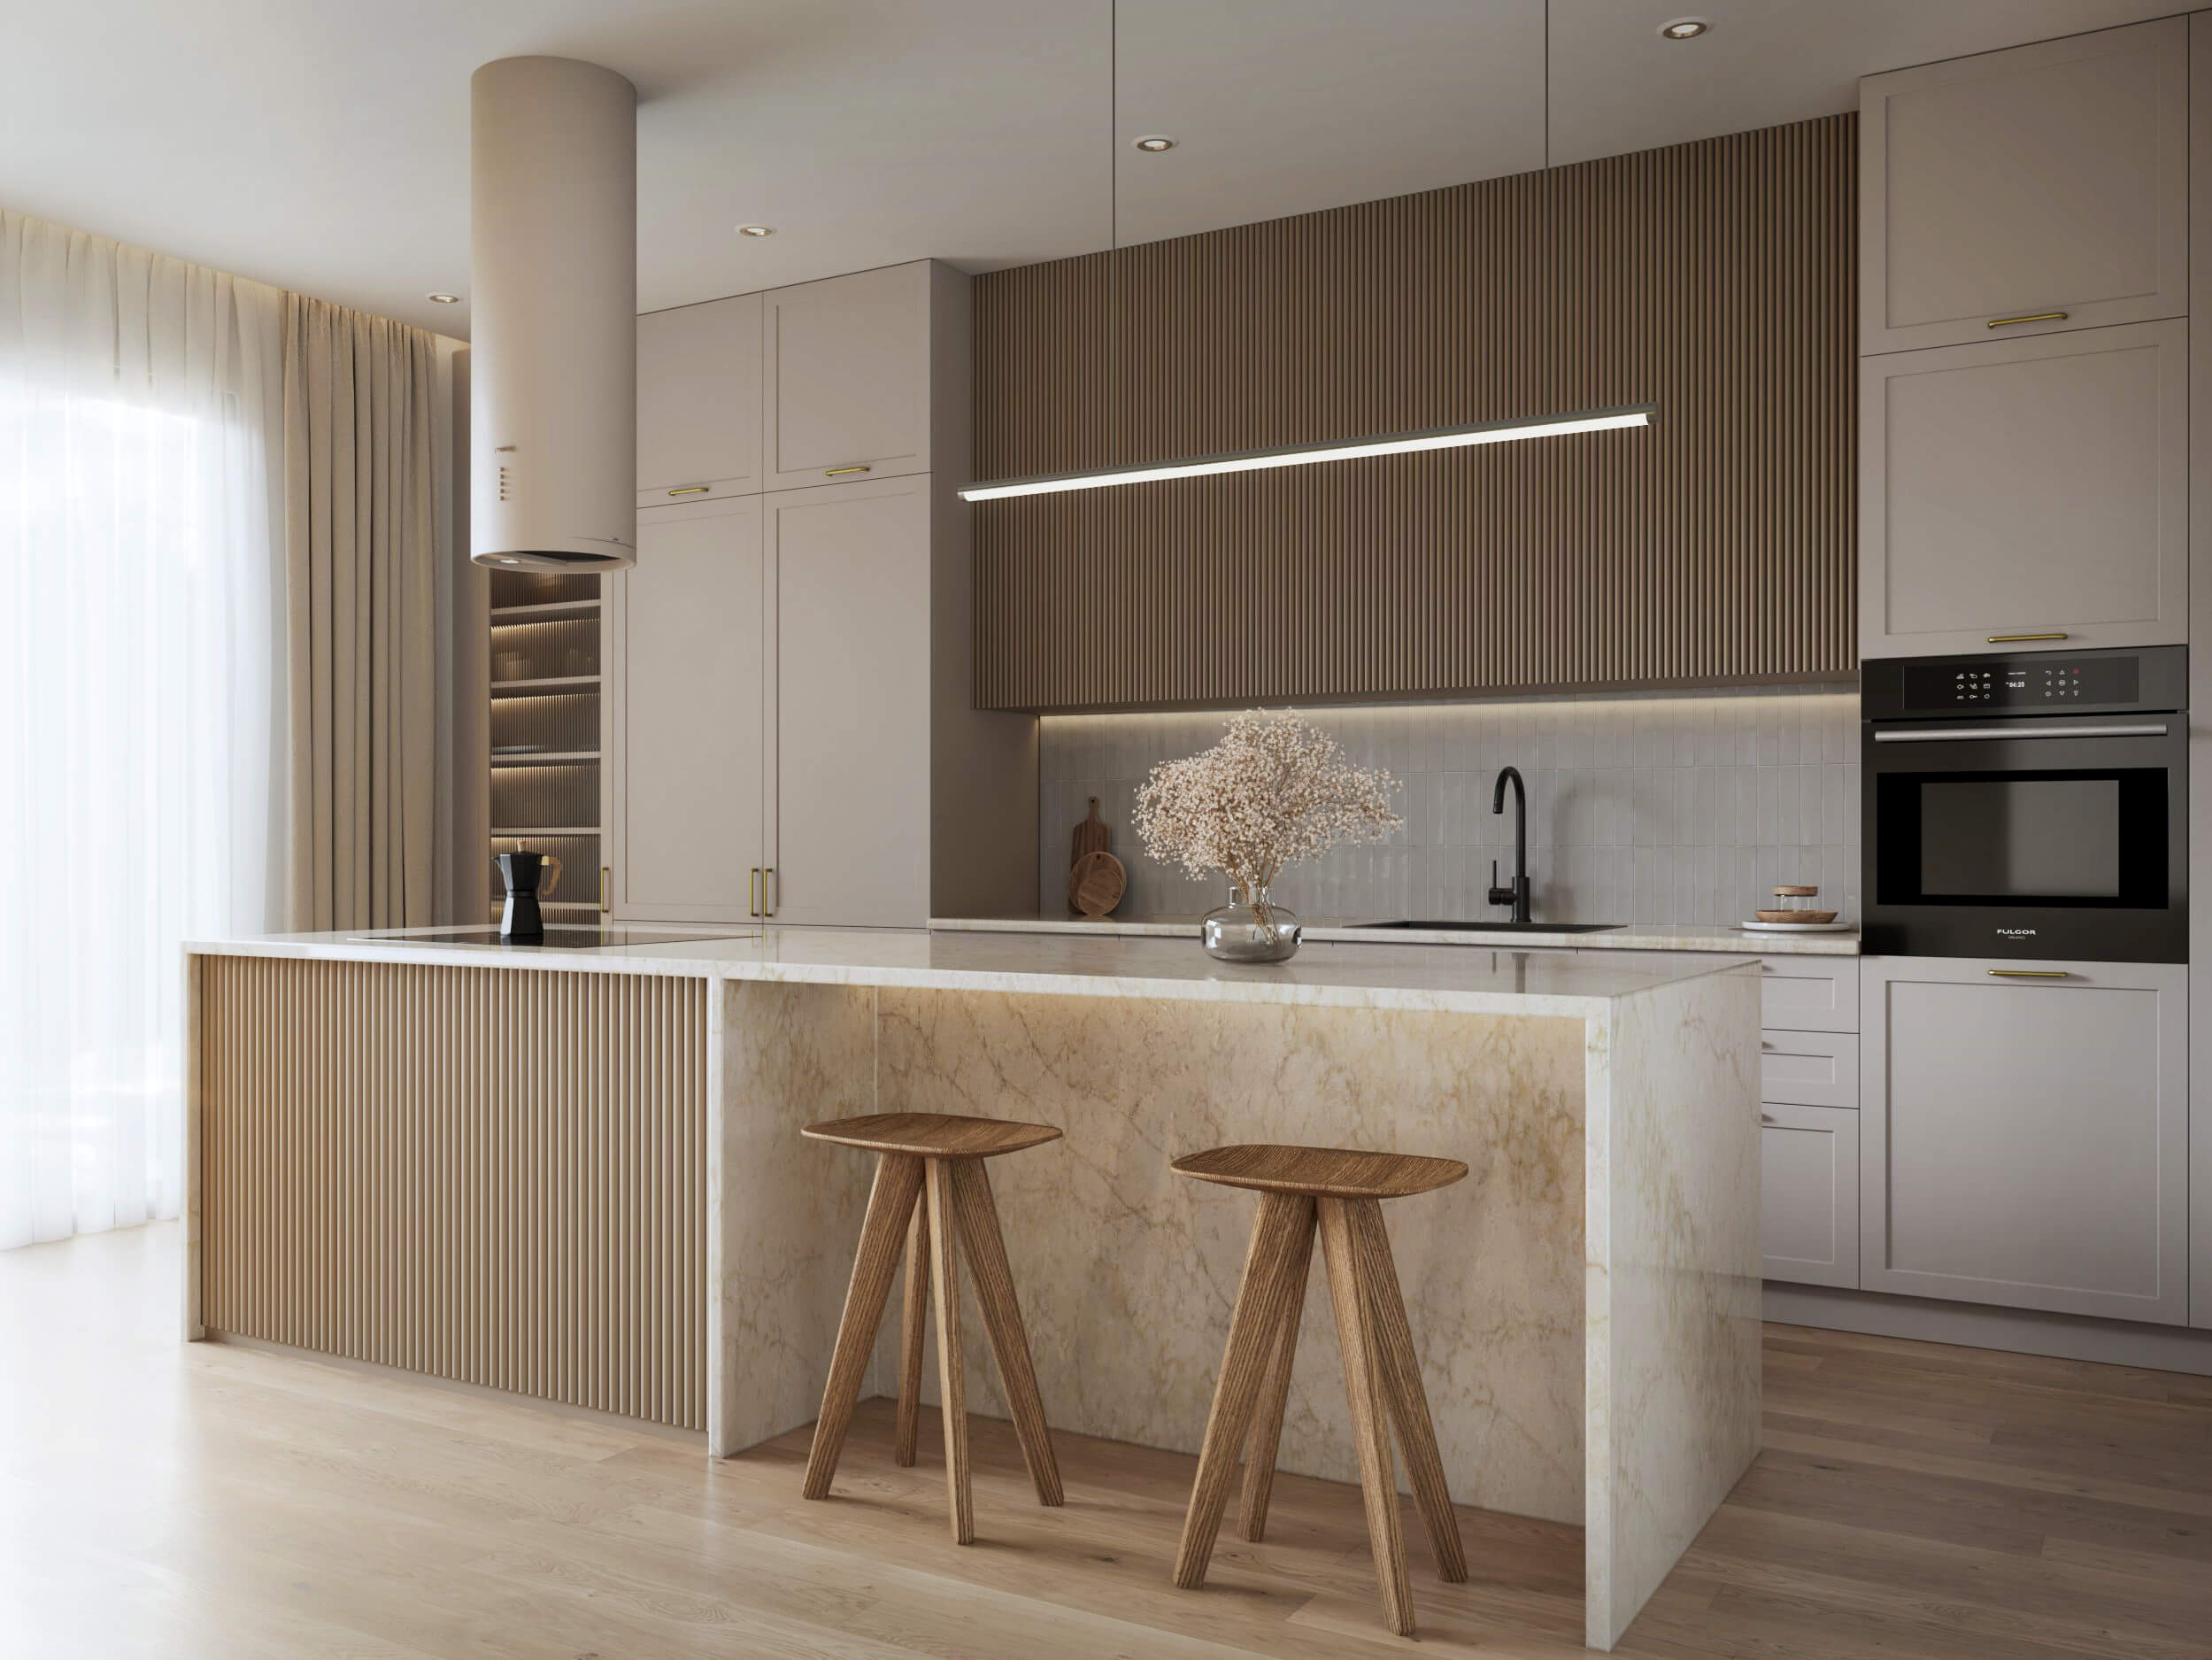
6. KITCHEN – MODELING
6.1 Project overview, modeling walls
6.2 Modeling window and floor
6.3 Modeling cabinets from inside
6.4 Modeling milled and ribbed fronts
6.5 Modeling trims, handles, ceiling island and adding appliances
7. KITCHEN – LIGHTING
7.1 Sunlight and Dome Light
7.2 Dome Light and rectangular light behind the window
7.3 Mesh Light, IES Light, and Emissive Material
7.4 Rectangular lights
8. KITCHEN – MATERIALS
8.1 Wall material – PBR
8.2 Floor material – PBR
8.3 Front material – Adding stain map
8.4 Handles and countertop material – Chaos Cosmos Library
8.5 Tile and faucet material
8.6 Material for oven, induction hob, lamp casing, pendant lamp, and bar stools
8.7 Curtain Material
9. KITCHEN – FINAL VISUALIZATION
9.1 Additional lights in the scene
9.2 Adding accessories and plants. V-Ray Mesh
9.3 Final Visualization: Light Optimization and Post-production
9.4 Depth of field and saving materials for future projects
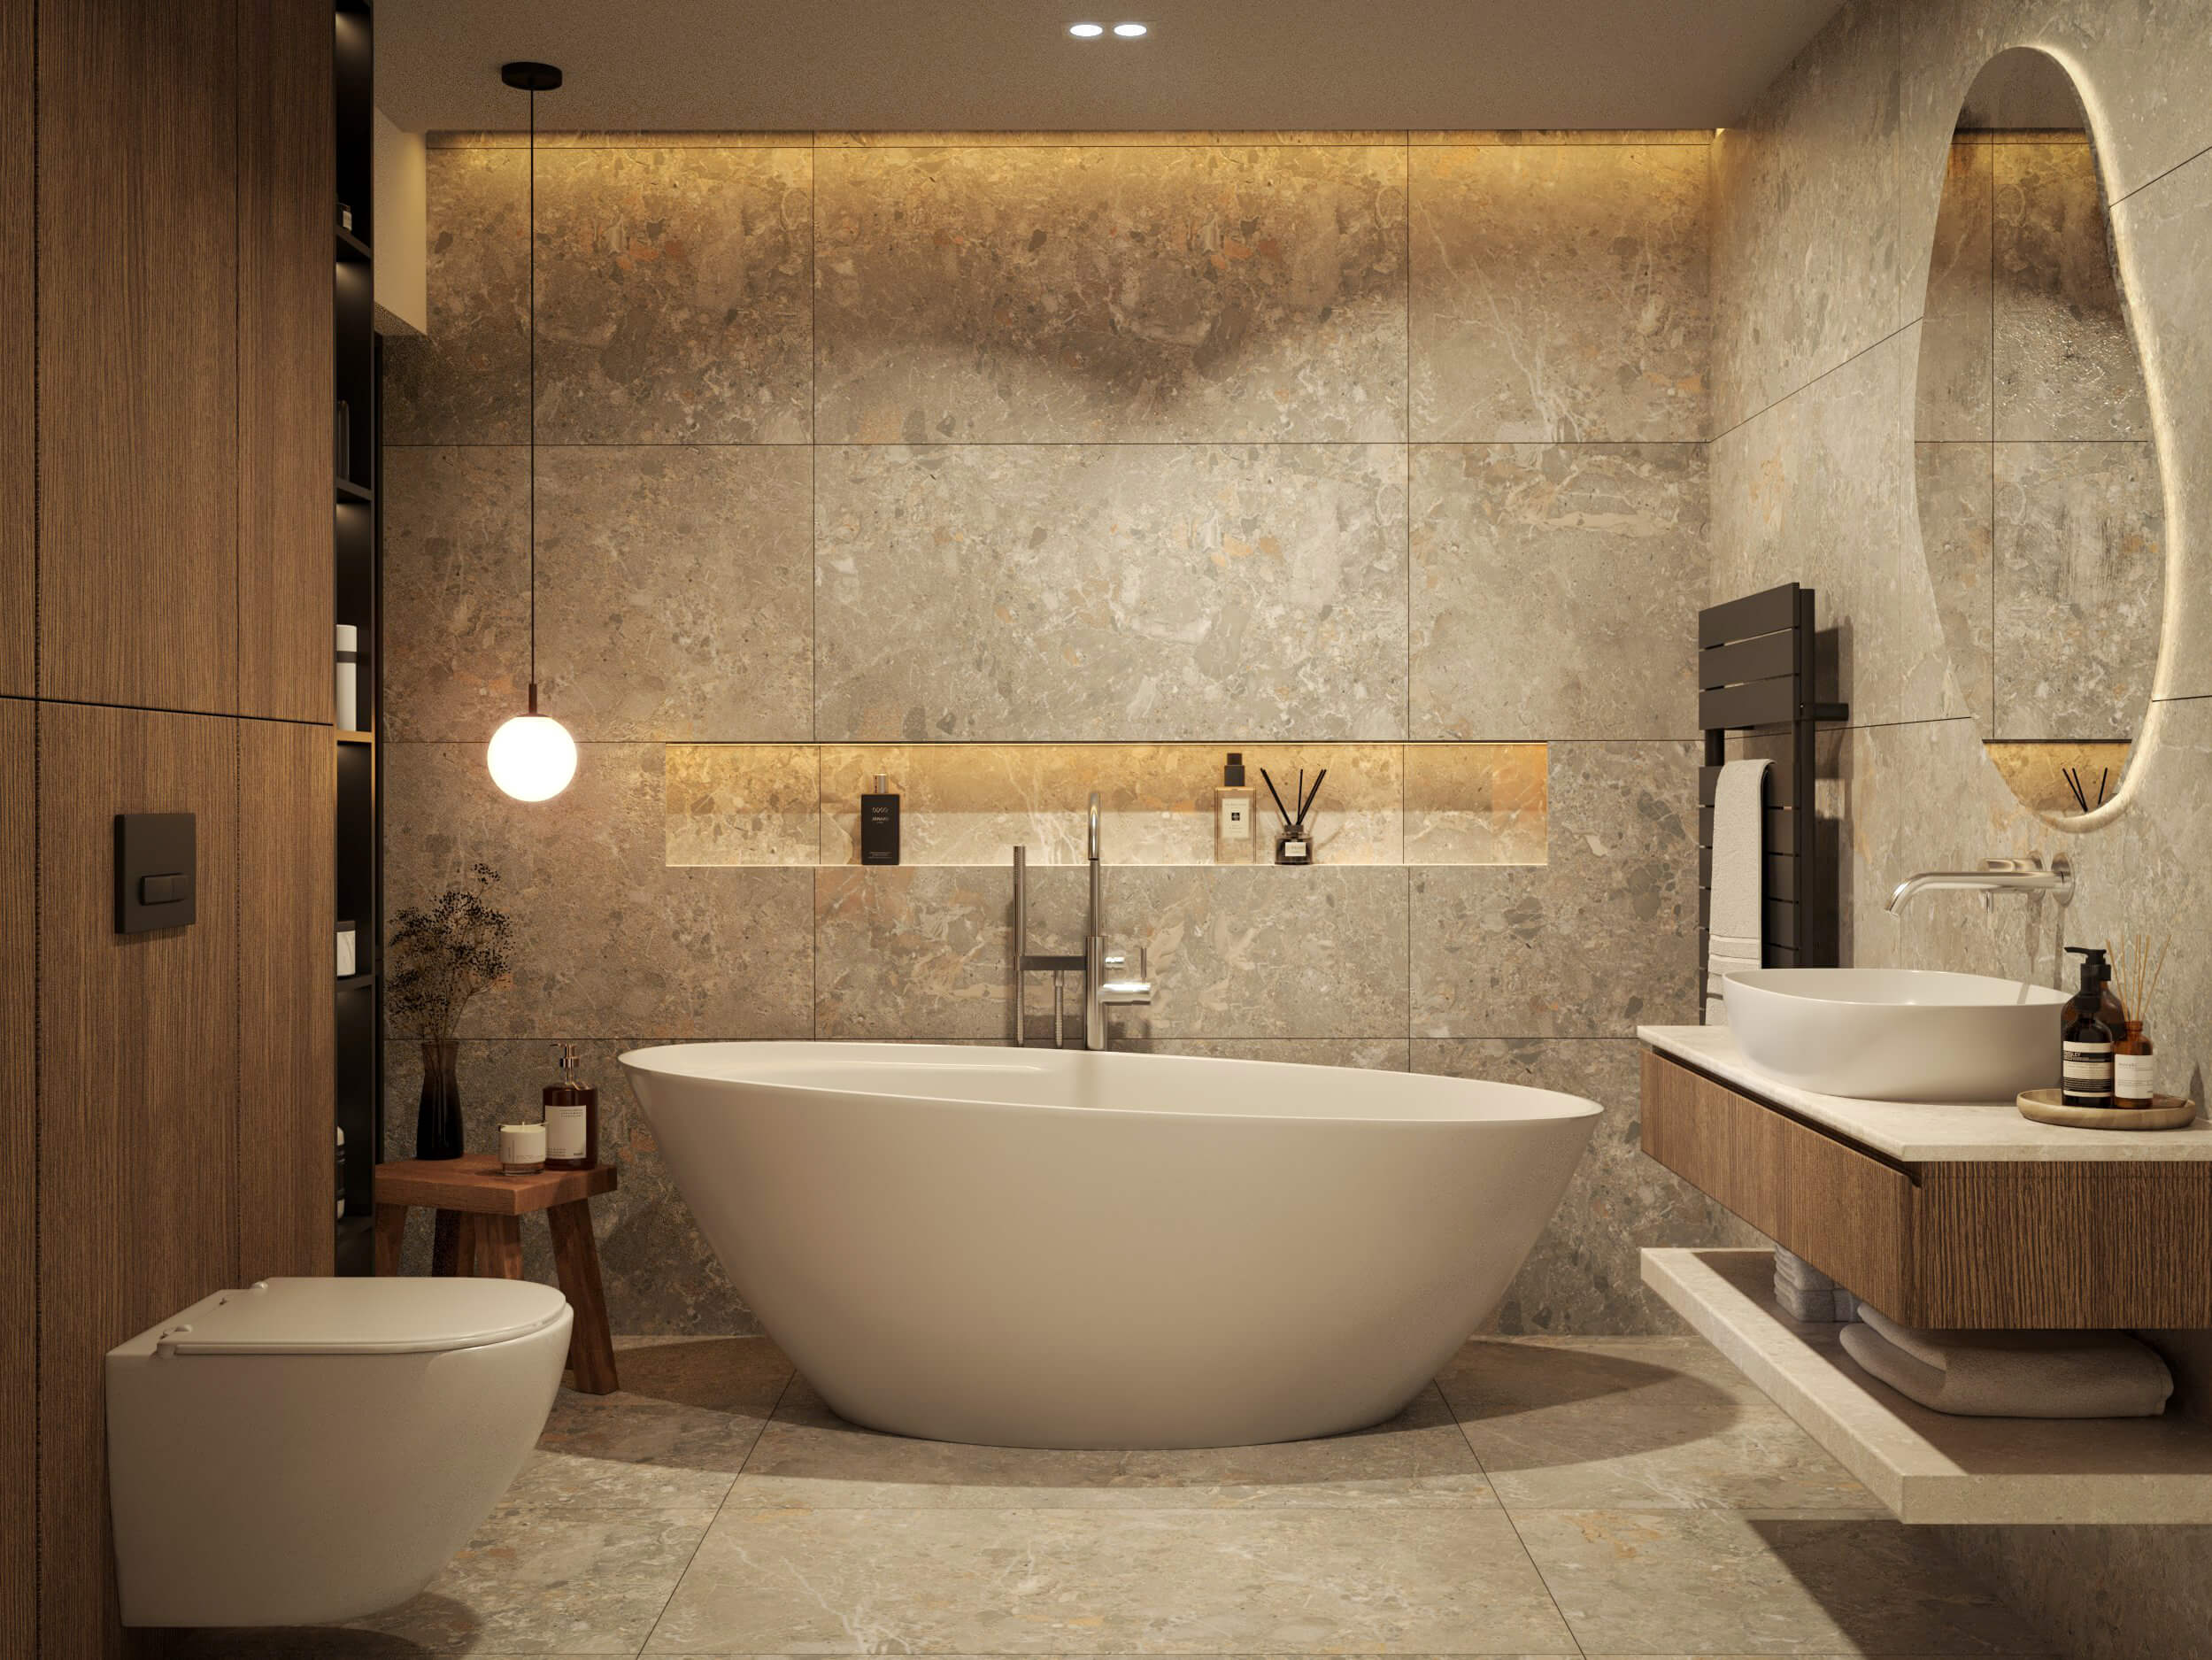
10. BATHROOM – MODELING
10.1 Bathroom Modeling – niches, cabinet, and under-sink unit
10.2 Bathroom Modeling – tiles
11. BATHROOM – LIGHTING
11.1 Dome Light and Rectangle Light behind the window
11.2 IES Light, Mesh Light, and Emissive
11.3 Rectangular Lights
12. BATHROOM – MATERIALS
12.1 Organizing materials. Copying wall and lamp casing material from the previous project
12.2 Creating different tiles in Photoshop
12.3 Tile Material – MultiSub Map
12.4 Panel and Wooden Front Material
12.5 Ceramic, Plastic, Metal, Faucet, and Mirror Material
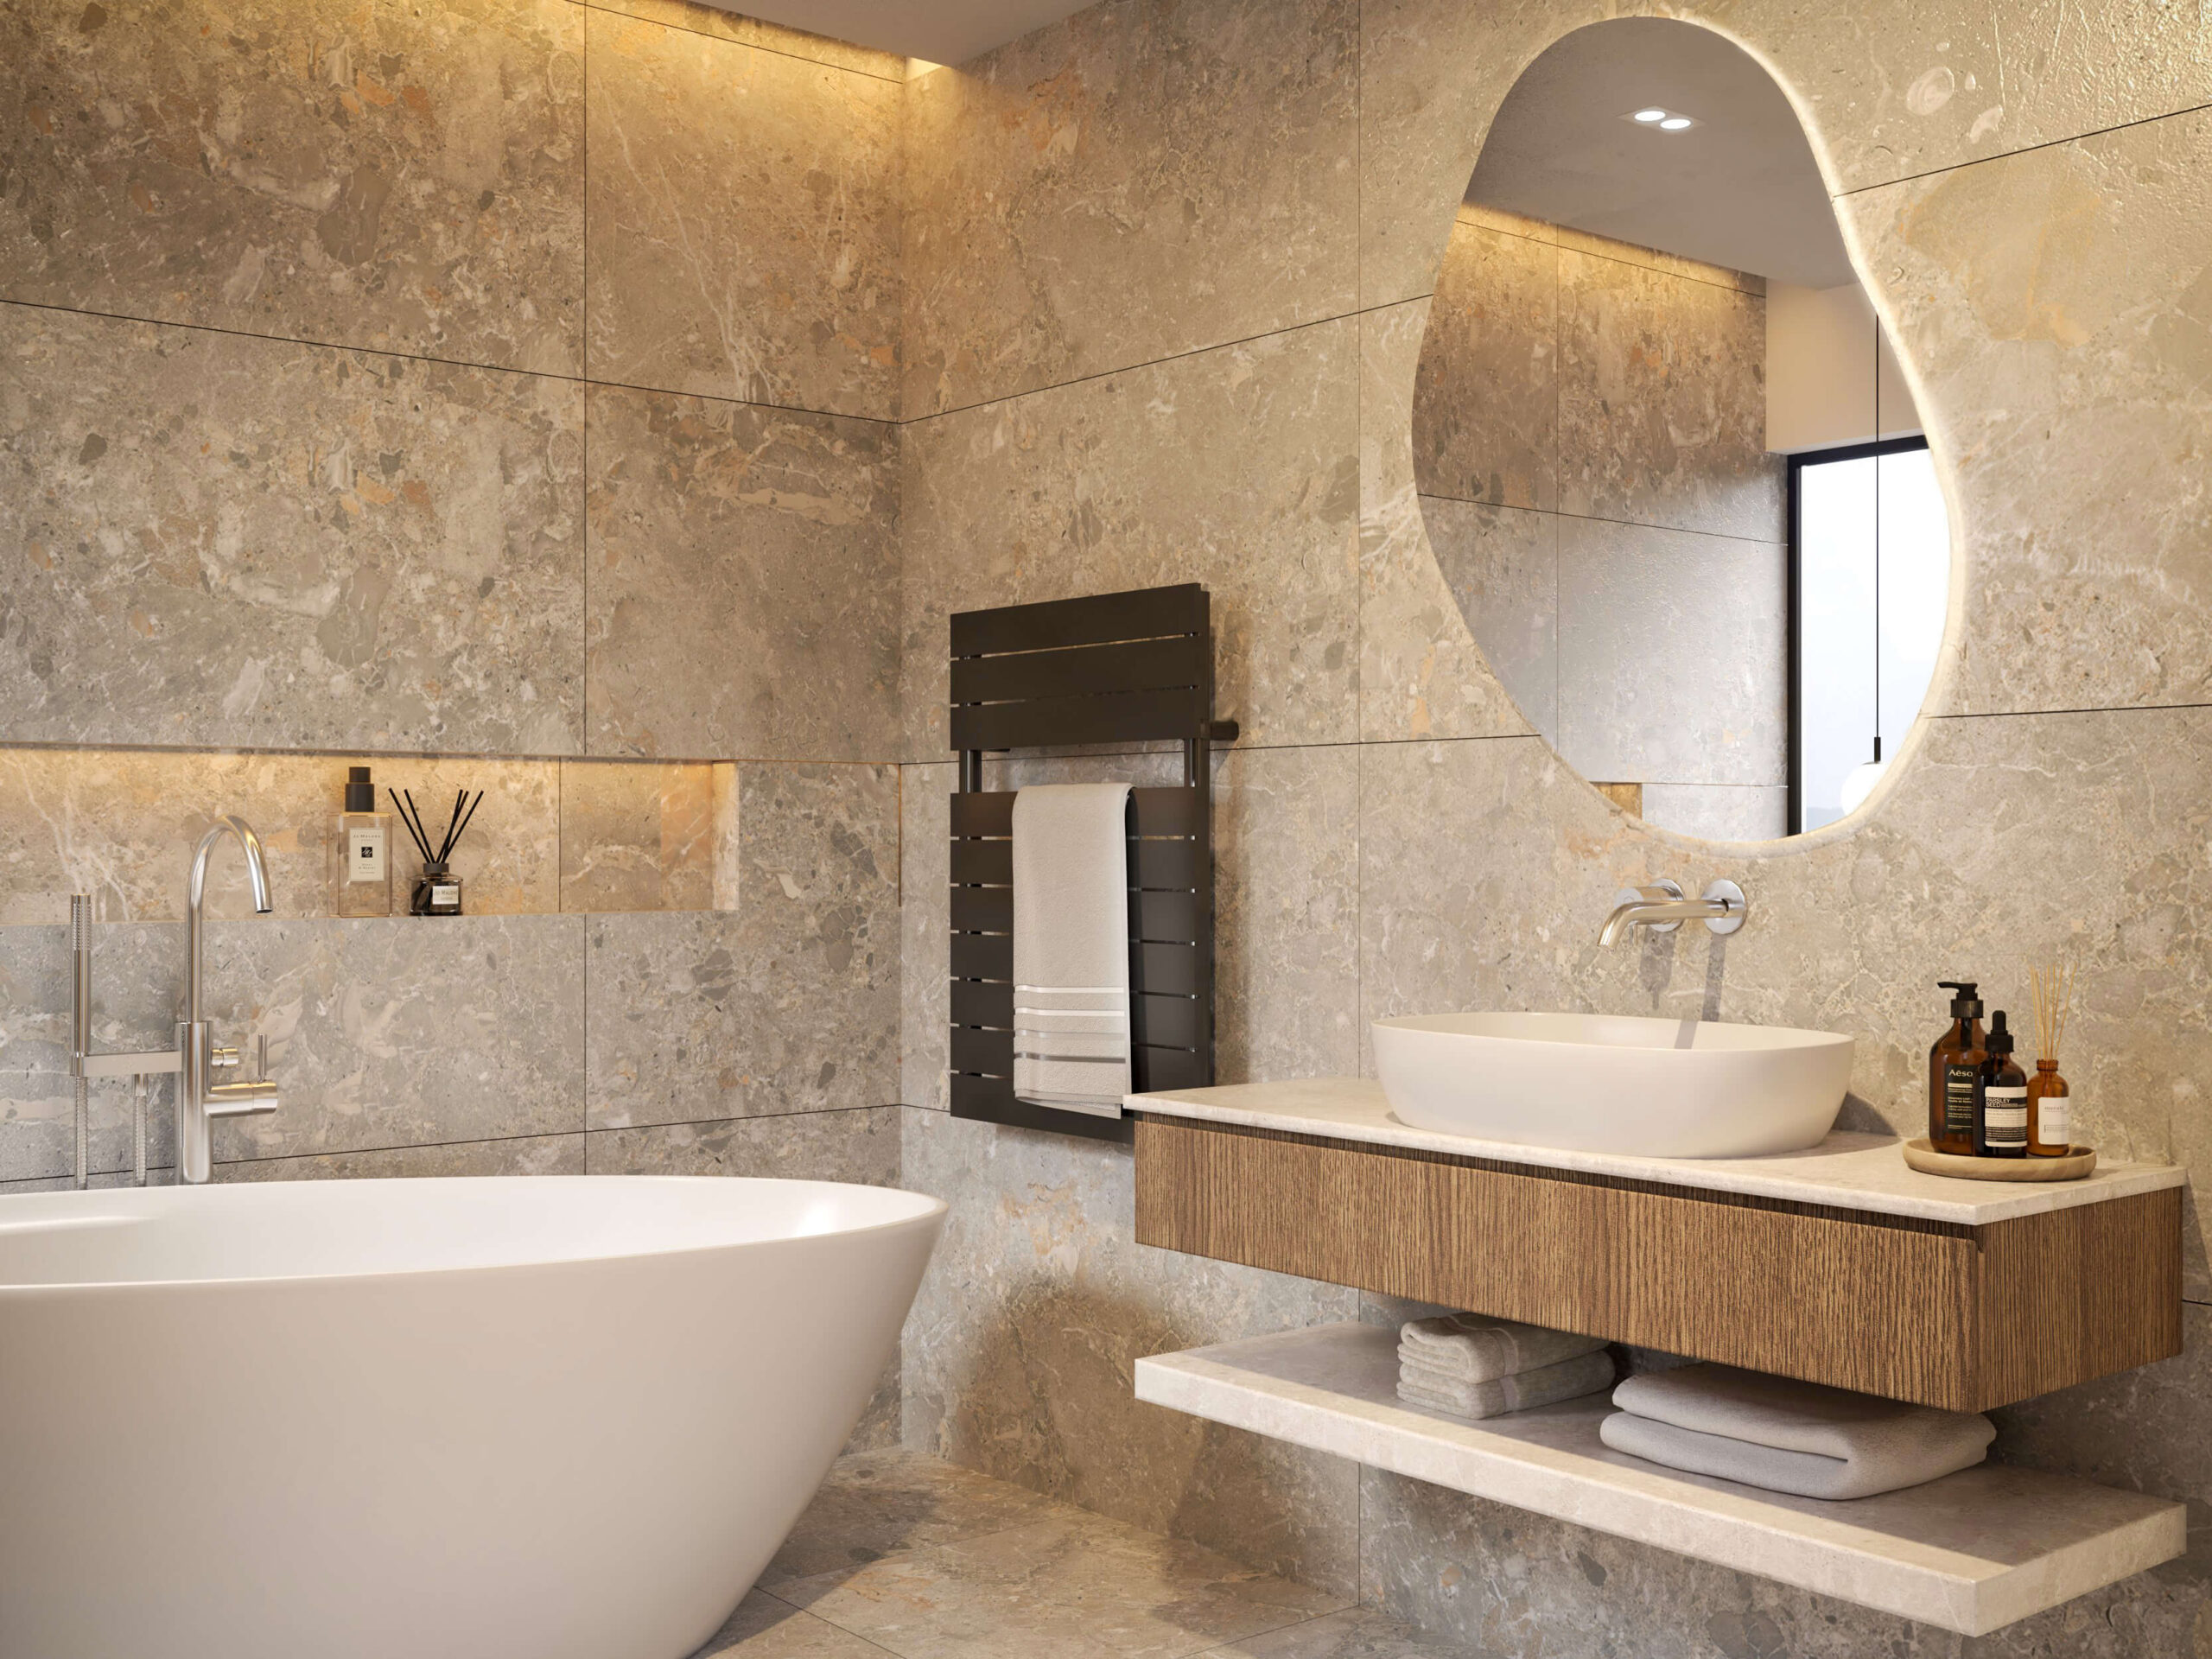
13. BATHROOM – POST-PRODUCTION
13.1 Adding invisible lights
13.2 Adding accessories and creating the first shot
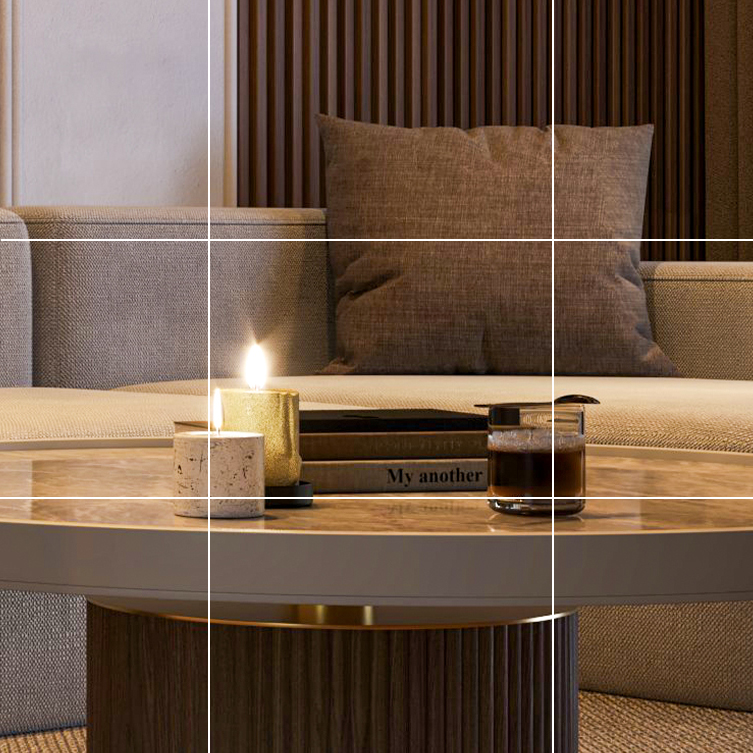
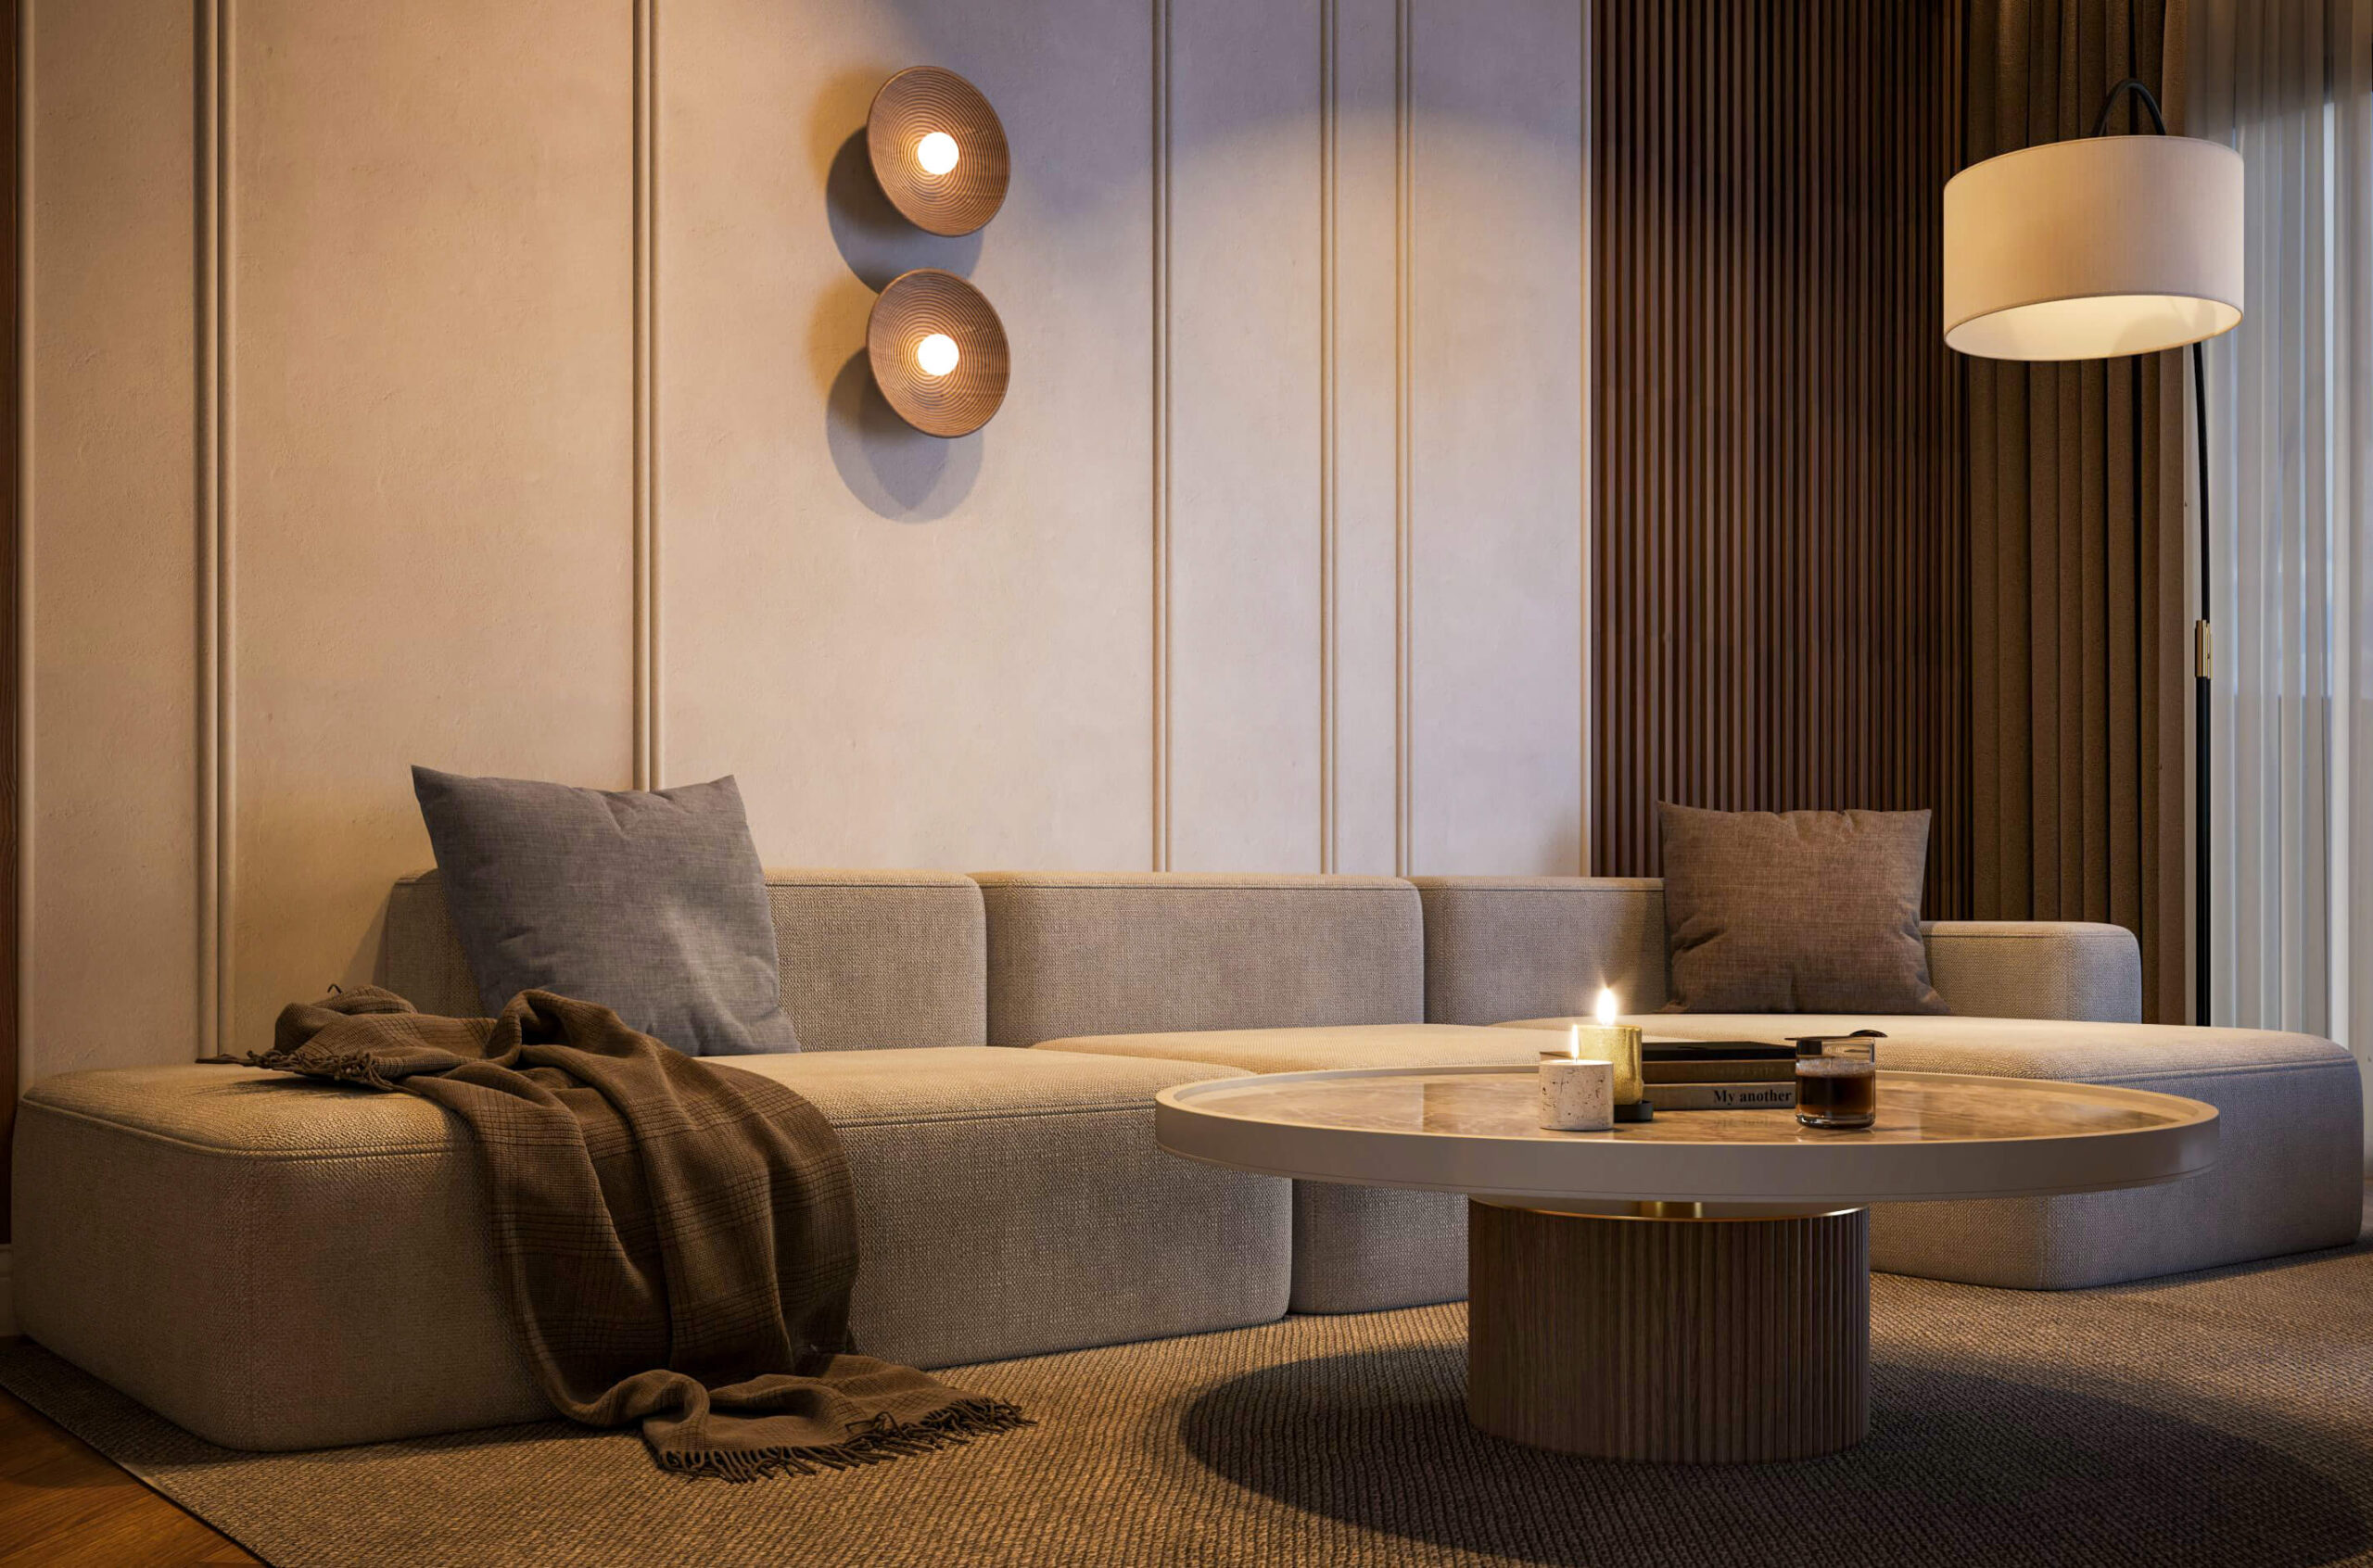
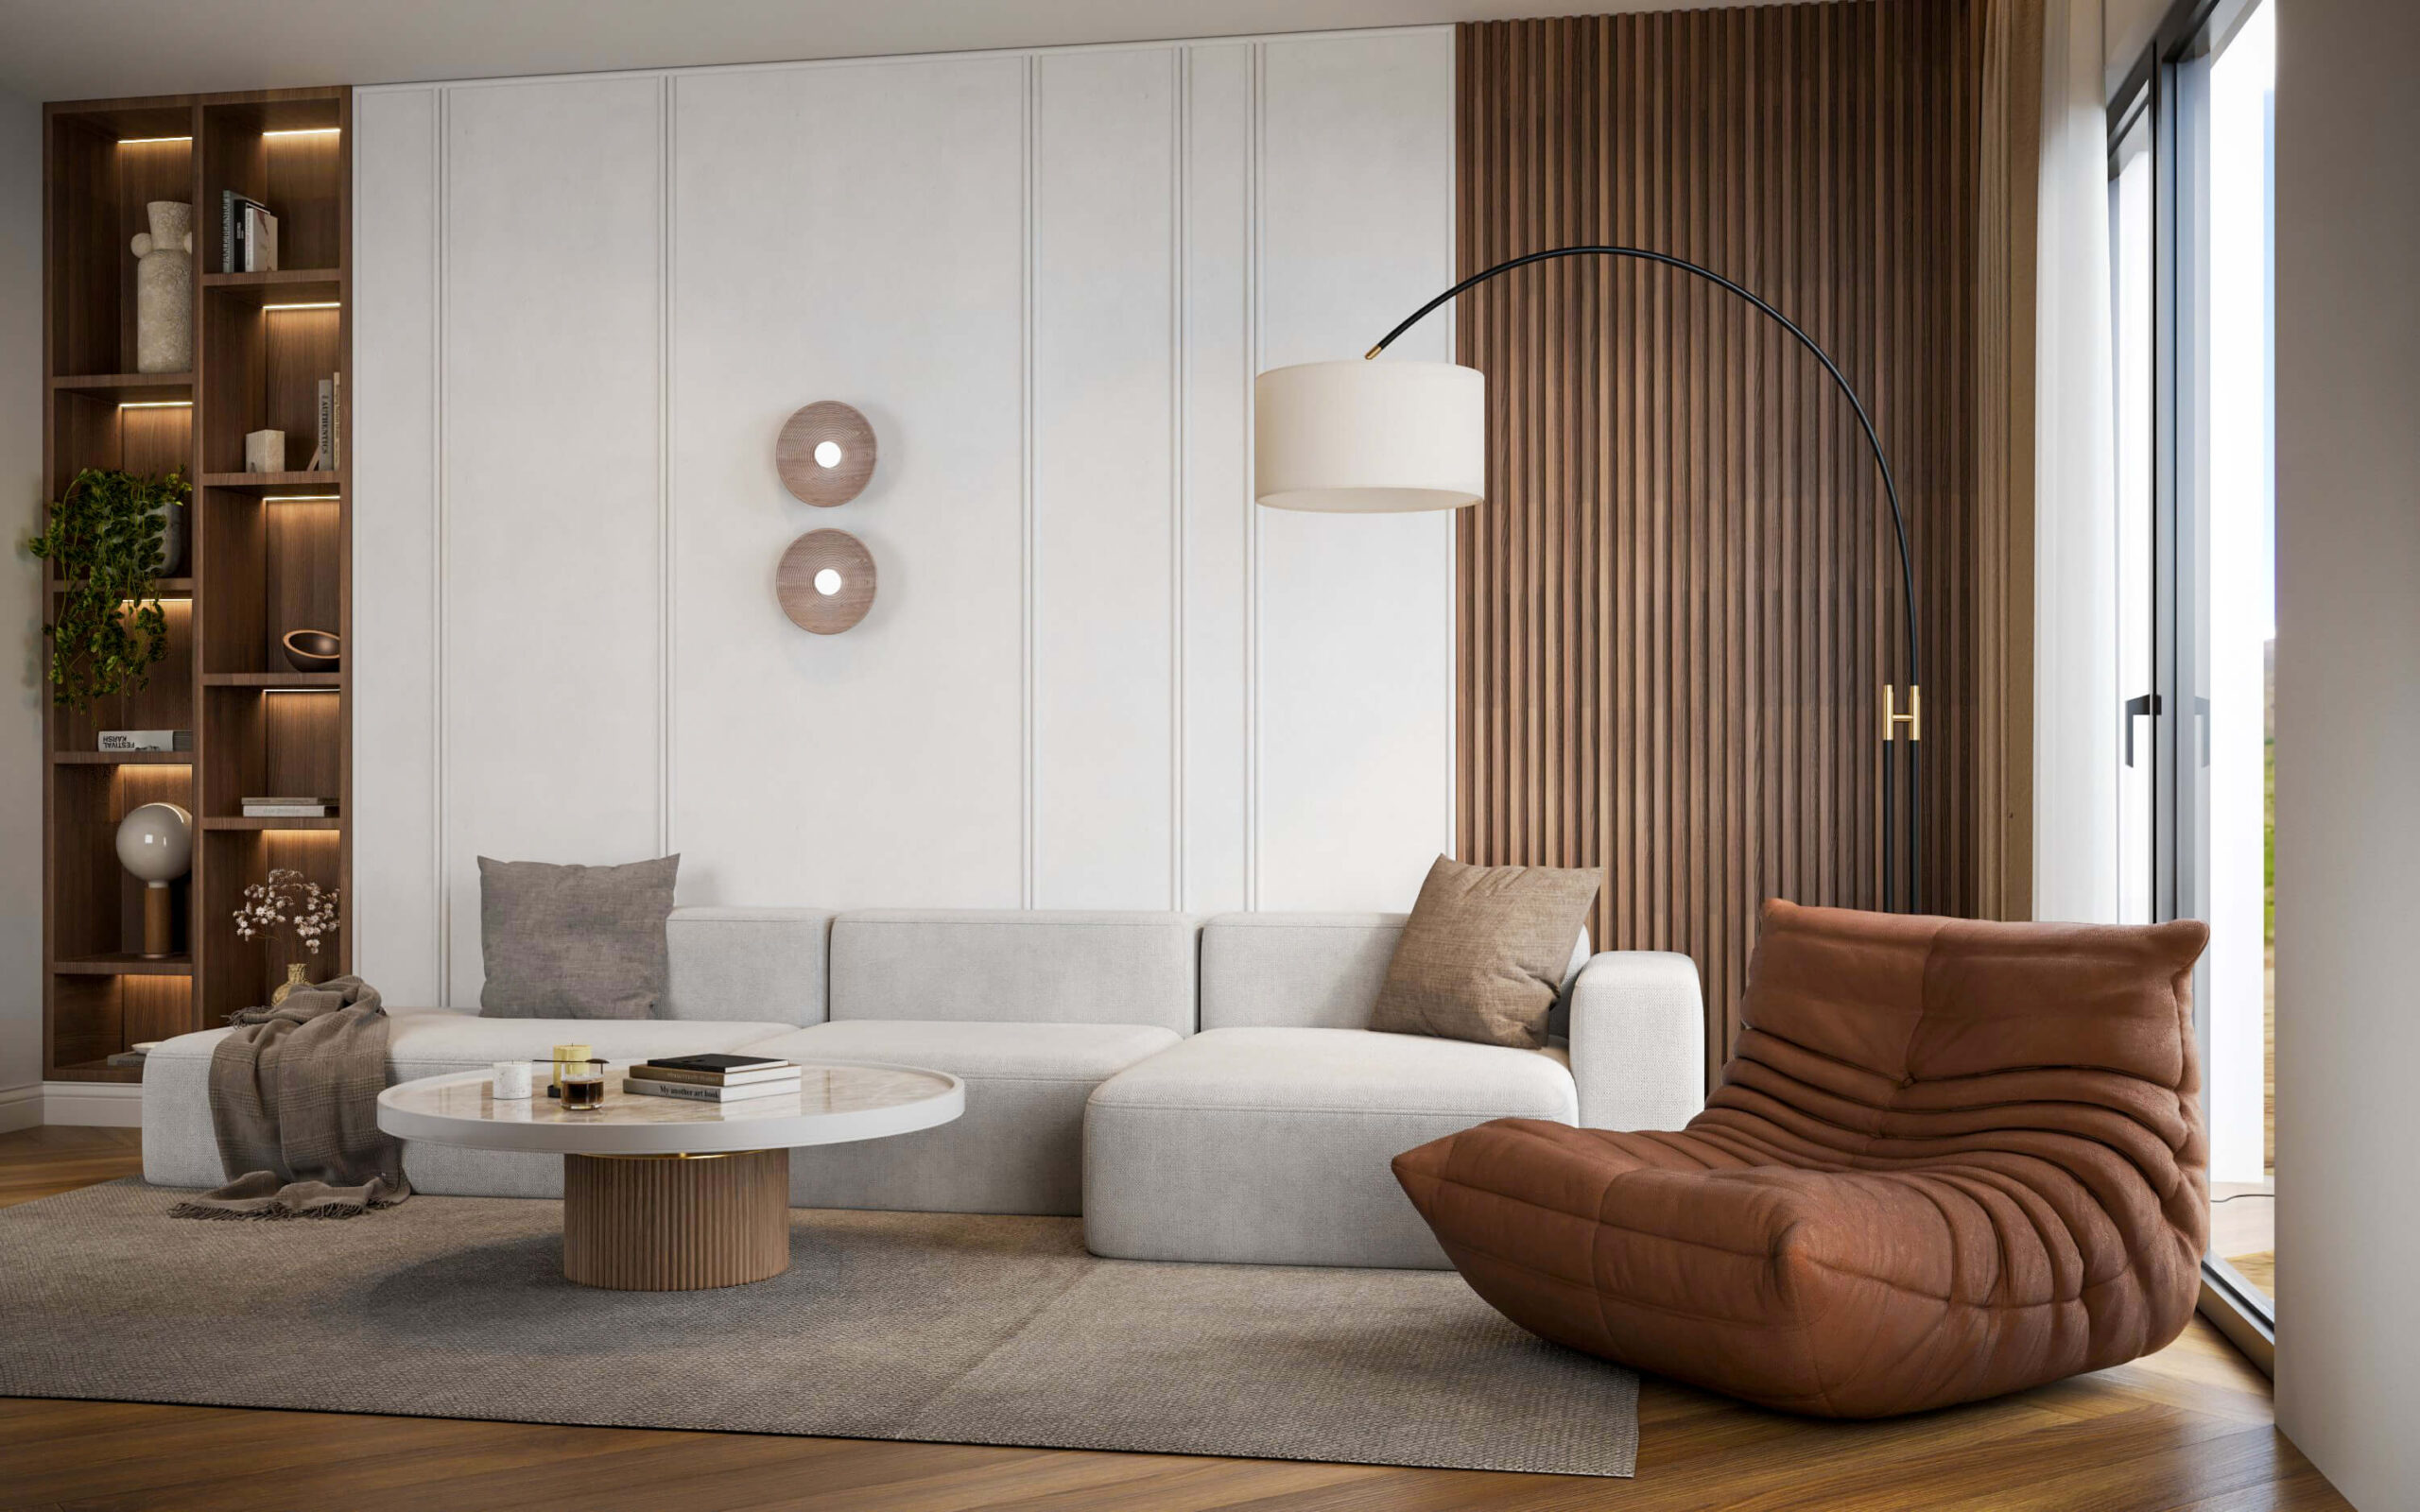
14. LIVING ROOM – MODELING
14.1 Modeling slabs and stucco
14.2 Modeling Panels and Molding
15. LIVING ROOM – LIGHTING
15.1 Dome Light view behind the window
15.2 Rectangular light behind the window, Mesh Light, Emissive Material 4:45
16. LIVING ROOM – MATERIALS
16.1 Copying wall materials, molding, and lamp from previous projects 5:57
16.2 Wooden floor material
16.3 Wood material for slats, coffee table, and wall lamp
16.4 Structural wall and coffee table countertop material
16.5 Sofa and carpet material
16.6 Lamp and armchair material
17. LIVING ROOM – FINAL VISUALIZATION
17.1 Adding accessories
17.2 Creating visualization and post-production
Visualization Course V-Ray for SketchUp
€399,00 €324,39 excl. VAT
Visualization Course V-Ray for SketchUp
€399,00 €324,39 excl. VAT


Start learning new skills at a better price :)
Instant access · Lifetime updates · Certificate included
I’ve just sent you an email with your 15% discount code.
Can’t find it? Be sure to check your spam folder—just in case. 😉